Diagnosing Voltage, Ground and Cable Problems
- Distinguish battery, charging, ground and cable faults from hydraulic faults.
- Check grounding and start-solenoid voltage under operating load.
- Apply maker-specific cable guidance and correct causes before replacing components.
- Digital multimeter — Check charging activity, fuse continuity with power isolated, and voltage at the start solenoid while operation is commanded.
- Jumper cable — Temporarily connect battery negative to the aluminum manifold for the documented ground-path check.
- Insulated hand tools — Disconnect power and service accessible electrical connections without bridging exposed terminals.
- Wire brush — Remove corrosion from disconnected connection surfaces so terminals can make sound electrical contact.
- Tape measure — Determine cable length for comparison with the applicable maker's cable-selection table.
The manual links low voltage with higher current draw, increased heat and reduced motor speed. It also describes carbon buildup at start-solenoid contacts, failed valve coils and damage to motor winding resin as possible consequences.
A poor ground can imitate a low battery. Other listed causes include unsuitable wire size, poor connections, corrosion, an auxiliary battery that is not charging and a blown fuse in the charging wire. The diagnostic task is to distinguish these causes rather than treating every symptom as a hydraulic failure.
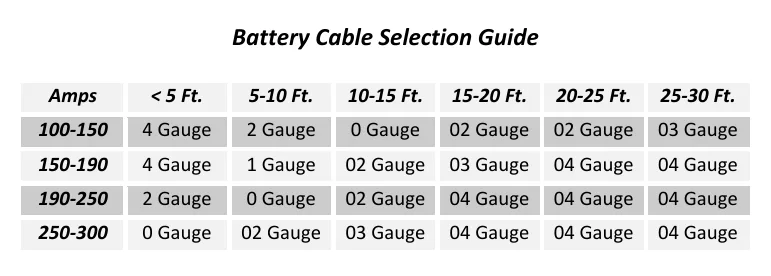
The documented ground check connects a jumper cable between battery negative and the aluminum manifold to improve the ground path. The cable-selection table separately relates current range and cable length to wire gauge. KTI lists 4 Gauge for 100–150 amps at less than 5 feet and 2 Gauge for the same current range at 5–10 feet; values vary by maker.
Check voltage while the unit is being commanded to operate when diagnosing a cylinder that will not extend. KTI notes that start-solenoid voltage may be below 9.5 volts during this complaint; this is a diagnostic observation, not a universal acceptance limit. Values vary by maker.
How It Works
Low voltage can create a damage cycle
The manual links low voltage with higher current draw, increased heat and reduced motor speed. It identifies carbon buildup at start-solenoid contacts, failed valve coils and damage to motor winding resin as possible consequences. Replacing a damaged solenoid without correcting the electrical supply problem leaves the replacement exposed to the same cause.
Resistance can imitate a discharged battery
Corrosion, poor connections, unsuitable cable size and a poor ground can restrict electrical delivery even when the battery appears charged. Resistance causes voltage loss and heating when current flows, so an unloaded voltage reading alone cannot establish that the circuit will perform under load. The documented battery-negative-to-manifold jumper check helps determine whether improving the ground path changes operation.
Interpret examples within the maker's guidance
KTI lists 4 Gauge for 100–150 amps at less than 5 feet and 2 Gauge for the same current range at 5–10 feet; values vary by maker. During a no-extension complaint, check start-solenoid voltage while operation is commanded rather than relying only on a resting reading. KTI's observation of voltage below 9.5 volts is a diagnostic clue, not a universal acceptance limit.
Step-by-Step Procedure
0/5 doneKTI electrical examples; values vary by maker
| Cable selection: 100–150 amps, less than 5 feet | 4 Gauge |
| Cable selection: 100–150 amps, 5–10 feet | 2 Gauge |
| Possible start-solenoid voltage during a no-extension complaint | Below 9.5 volts |
Figures
Diagnostic Chart
| Symptom | Check | Spec / Expected | Likely cause & fix |
|---|---|---|---|
| Auxiliary battery loses charge or the hoist repeatedly operates slowly. | Check whether the auxiliary battery receives charge, then inspect the charging-wire fuse, connections and corrosion. Isolate power before checking fuse continuity or servicing terminals. | Confirm charging operation using the applicable maker's procedure; the lesson supplies no universal charging-voltage limit. | An auxiliary battery that is not charging, a blown charging-wire fuse, corrosion or poor connections can leave the motor supply inadequate. Basis: Hydraulics-Troubleshooting-Manual 2019 |
| Operation resembles a low battery despite apparent battery charge. | With the trailer secured against unintended movement, connect a jumper cable between battery negative and the aluminum manifold. Keep the cable clear of moving parts and compare operation with the ground path improved. | The documented ground check connects battery negative to the aluminum manifold. | Improved operation supports a poor-ground diagnosis; inspect and repair the normal ground path rather than treating the jumper as a permanent repair. Basis: Hydraulics-Troubleshooting-Manual 2019 |
| Motor runs slowly or cables and connections show heating. | Inspect cable condition, terminal contact and corrosion. Identify cable gauge, determine cable length and compare the installation with the applicable maker's current-and-length table. | KTI examples: 100–150 amps at less than 5 feet uses 4 Gauge; 100–150 amps at 5–10 feet uses 2 Gauge. Values vary by maker. | Unsuitable cable size or resistive connections can reduce voltage delivered to the motor and generate heat. Basis: Hydraulics-Troubleshooting-Manual 2019 |
| Cylinder will not extend. | Check voltage at the start solenoid while commanding operation, keeping personnel clear of possible bed movement. Investigate charging, ground and cable faults before condemning hydraulic components. | Possible start-solenoid voltage during this complaint: Below 9.5 volts. This is a diagnostic observation, not a universal acceptance limit. | Low battery voltage or losses through the supply and ground paths may prevent satisfactory electrical operation. Basis: Hydraulics-Troubleshooting-Manual 2019 |
At the Bay: Diagnose the Case
CASE 1 / 4
Auxiliary battery loses charge or the hoist repeatedly operates slowly.
- Test
- Compare
- Correct
Select the next check
Basis: Hydraulics-Troubleshooting-Manual 2019. A likely cause is a hypothesis; confirm it with the applicable service procedure before repair.
Common Bay Mistakes
- ✕ Condemning hydraulic components before checking electrical delivery under load.
- ✕ Treating a temporary ground jumper as a permanent repair.
- ✕ Applying KTI examples as universal limits for every maker.
- ✕ Replacing a failed solenoid without correcting low voltage or poor grounding.
Quick Check
Practice only — not scored.
Plan the Service Sequence
Planning practice only. Follow the applicable manufacturer's instructions, employer safety program and qualified supervision on real equipment.
Plan the first action. Compare the service steps with the bay mistakes.
Hands-on: Shop Test Equipment
Hydraulic Pressure & Relief Gauge
0–5,000 psi gauge on the pump pressure port, DC clamp meter, battery voltmeter
🛠 Equip your bay for this test →Symptom: Routine check before a customer pickup.
Spec limits used
- 3,200 psi — Primary relief (factory preset) (KTI Hydraulics Troubleshooting Manual 2019)
- 1,500 psi — Secondary relief, circuit 111 (KTI Hydraulics Troubleshooting Manual 2019)
- below 9 V — Low-voltage alarm (KTI remote)
- illustrative only — Motor current & voltage drop (General shop practice)
Simulated readings for practice. Always follow the manufacturer's procedure and values on a real trailer.
Source: Hydraulics-Troubleshooting-Manual 2019 — 13-22