Inspect and Install Hub Seals
- Decide when a seal must be replaced
- Prepare the journal and bore
- Drive a seal square and to the right depth
- Seal puller / screwdriver — Remove the old seal (never drive it out with the bearing)
- Fine file and very fine emery cloth — Deburr and clean the journal
- Seal driver sized to the outer case — Install evenly (clean wood block is the alternative)
- Straightedge / feeler gauge — Check seal flatness
- Sealant or light oil — Per seal construction
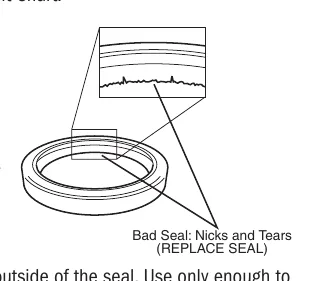
Whenever a hub is removed, inspect its seal for cuts, tears and any doubt about its ability to retain lubricant. Use the replacement seal specified for the assembly. Remove a seal with a seal-removal tool or screwdriver; do not use the inner bearing to drive it out, because that can damage the bearing.
Clean the spindle seal journal and inspect it for roughness or damage. The source describes removing burrs from the leading edge or shoulder with a file and cleaning the journal with very fine emery cloth. Deep grooves or scratches can cause leakage and may require axle-beam replacement. Also clean and inspect the hub's seal bore for damage that could prevent sealing.
Follow the seal's construction when preparing it. The source calls for a thin external coating of suitable sealant on seals without a rubber-coated outside, keeping excess away from the rubber lips. For a rubber-coated outside, it specifies no sealant and recommends a thin oil coating instead. A small amount of lubricant on the inner lips can aid spindle installation. On oil-bath seals marked AIR SIDE, that marking faces the trailer.
Drive the seal evenly and squarely with a correctly sized tool that contacts the outer casing ring; a clean wood block is the stated alternative. Never strike the seal directly. Dexter specifies a flush position at the hub's back surface for its 600–8,000 lb capacity product line and seal flatness within 0.010 inch; these values and installation requirements vary by maker. Driving a seal too deeply can damage it and interfere with the inner bearing, while a cocked seal is more likely to leak.
How It Works
How a lip seal works
The rubber lip rides on the spindle journal with light pressure. A burr, groove or dirty journal lets grease out and water in. The outside of the seal must seal against the hub bore.
Why depth and squareness matter
Too deep and the seal can contact the inner bearing; cocked and the lip loads unevenly and leaks. Dexter specifies flush with the hub back face and within 0.010 inch flat for its 600–8,000 lb line.
Prepare for the seal construction
A rubber-coated outside requires no sealant and the specified thin oil coating. An uncoated case follows the stated external sealant preparation. Keeping sealant off the lips and confirming AIR SIDE orientation protects both the outside fit and the moving sealing surface.
Step-by-Step Procedure
0/7 doneDexter seal-installation examples; values vary by maker
| Flush installation scope | 600–8,000 lb capacity product line: seal flush with the hub's back surface. |
| Installed seal flatness | Within 0.010 inch. |
Figures
Diagnostic Chart
| Symptom | Check | Spec / Expected | Likely cause & fix |
|---|---|---|---|
| Seal leaks soon after replacement | Journal surface under the lip | Smooth, no deep grooves | Grooved journal — deep damage may require axle-beam replacement. Basis: Dexter 059-831-00 |
| Seal sits uneven | Flatness at several points | Within 0.010 in (Dexter 600–8,000 lb) | Driven off-square — replace the seal. Basis: Dexter 059-831-00 |
| Oil-bath hub leaks | AIR SIDE marking | AIR SIDE faces the trailer | Seal installed backward. Basis: Dexter 059-831-00 |
At the Bay: Diagnose the Case
CASE 1 / 3
Seal leaks soon after replacement
- Test
- Compare
- Correct
Select the next check
Basis: Dexter 059-831-00. A likely cause is a hypothesis; confirm it with the applicable service procedure before repair.
Common Bay Mistakes
- ✕ Driving the old seal out with the inner bearing.
- ✕ Striking the seal face directly with a hammer.
- ✕ Putting sealant on a rubber-coated seal OD.
- ✕ Reinstalling a seal 'that looks OK' when any doubt exists.
Quick Check
Practice only — not scored.
Plan the Service Sequence
Planning practice only. Follow the applicable manufacturer's instructions, employer safety program and qualified supervision on real equipment.
Plan the first action. Compare the service steps with the bay mistakes.
Hands-on: Shop Test Equipment
Dial Indicator — Bearing End Play
Magnetic-base dial indicator (0.001 in) on the hub face, spindle nut adjustment
🛠 Equip your bay for this test →Symptom: Bearing service — set end play after repack.
Spec limits used
- 0.001–0.010 in — Allowable end play, double-nut wheel end (Dexter 9-15K service manual, p.64)
- 0.008 in — Nev-R-Lube 50 mm max axial end play (Dexter 059-831-00)
- illustrative only — Face runout limit (General shop practice)
Simulated readings for practice. Always follow the manufacturer's procedure and values on a real trailer.
Source: 059-831-00 HubDrumBearingInstructionSheet — 2