Adjust Conventional Bearings and Reassemble the Wheel End
- Seat bearings with the initial torque while rotating
- Set final castle-nut position without preloading
- Torque wheel nuts in stages and the correct sequence
- Torque wrench (ft-lb) — Initial spindle-nut seat and wheel stages
- Spindle-nut socket — Castle nut
- New cotter pin — Never reuse
- Rubber mallet — Seat dust cap
- Dial indicator, magnetic base — Verify end play where the maker specifies it
- Lug socket, no impact gun — Hand-start and stage-torque wheel nuts
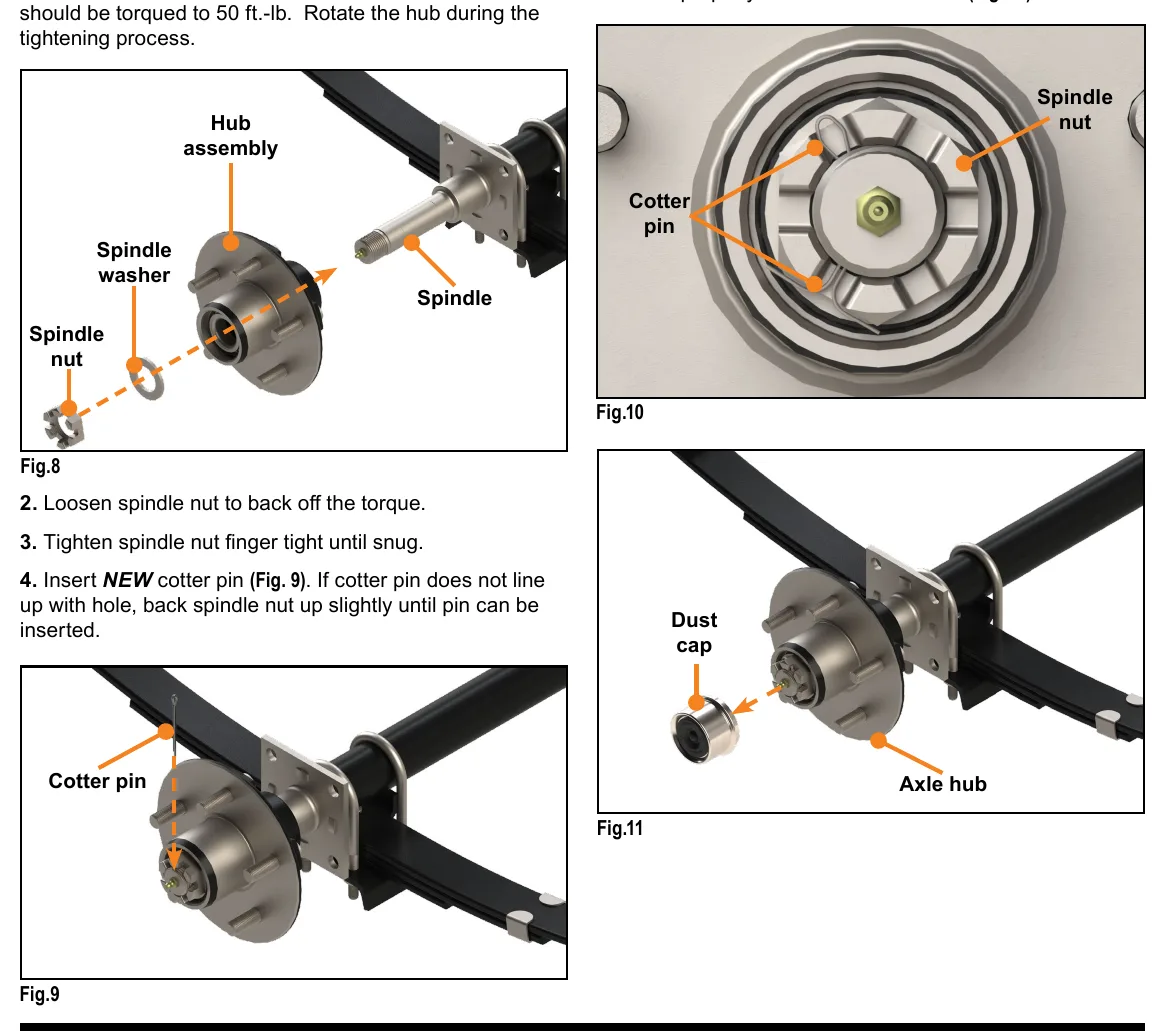
This lesson follows the supplied conventional idler-hub procedure with a castle nut and cotter pin. Wipe grease from the spindle before fitting the replacement hub, then install the hub assembly, spindle washer and spindle nut. Do not treat this sequence as an adjustment procedure for every bearing design.
Lippert specifies an initial spindle-nut torque of 50 ft-lb while rotating the hub for this assembly; values vary by maker and design. This is an initial adjustment step, not the final condition. Release the applied torque, then bring the nut to a snug position using fingers.
Fit a new cotter pin. If its hole does not align, back the nut off slightly until the pin fits rather than tightening it further. Bend the pin to retain the nut. At completion, the nut should remain free to move, restrained by the cotter pin. Seat the dust cap against the hub face with a rubber mallet.
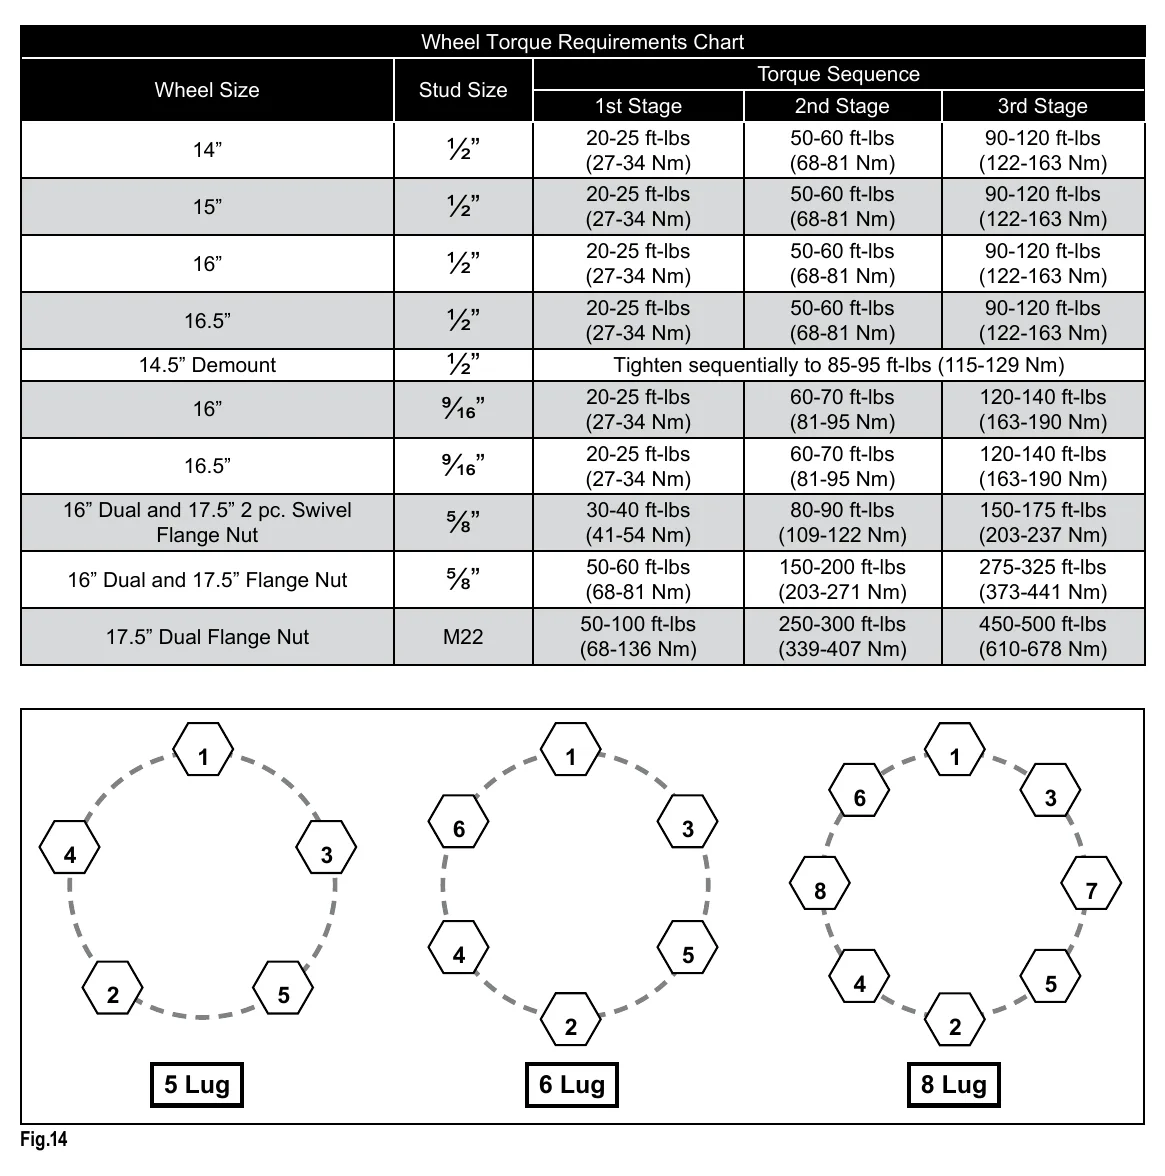
Reinstall the wheel with fasteners that match its cone angle. Start the fasteners by hand to avoid cross-threading, then hand-tighten them in the illustrated sequence. Use a torque wrench and the chart for the actual wheel, stud and fastener arrangement; apply torque in stages using the specified sequence.
Wheel torque must be applied before road use and after wheel removal. Lippert's supplied procedure calls for lug-nut checks and re-torque after 10, 25 and 50 miles, plus periodic checks during normal service; intervals vary by maker. Accurate torque helps prevent loosening, damaged studs and hazardous wheel failures.
How It Works
Why torque while rotating, then back off
Turning the hub while applying the 50 ft-lb initial torque rolls the cones fully into their cups and squeezes out excess grease. That torque would preload and overheat the bearings if left, so it is released and the nut is reset finger-snug.
End play vs preload
A small amount of end play lets the bearings run cool as the hub expands with heat. Preload (no play, nut tight) makes heat and fails bearings quickly; too much play hammers the races and lets the seal wander. Dexter lists 0.001–0.010 in for its double-nut wheel end — always use the value for the axle in front of you.
Why stage torque wheel nuts
Tightening each nut fully before the others pulls the wheel off-center. Stages in a cross pattern seat the wheel evenly on the hub face; studs stretch slightly and the wheel settles, which is why re-torque at 10, 25 and 50 miles is required.
Step-by-Step Procedure
0/8 doneLippert idler-hub examples; values vary by maker and configuration
| Initial spindle-nut torque | 50 ft-lb while rotating the hub; release torque before final finger-tight adjustment. |
| Example wheel torque stages | 14-inch wheel with 1/2-inch studs: 20–25, then 50–60, then 90–120 ft-lb. |
| Post-installation lug-nut checks | Check and re-torque after 10, 25 and 50 miles. |
Figures
Interactive Demonstration
Hub installed with washer and castle nut. Begin the adjustment.
Tap studs in cross order. Next: stud 1.
Torque values from the Lippert chart for this wheel/stud size; always use the chart for the actual wheel and fasteners.
Diagnostic Chart
| Symptom | Check | Spec / Expected | Likely cause & fix |
|---|---|---|---|
| Hub runs hot after service | Hub temperature after a short run; end play | Nut finger-snug, cotter-retained (Lippert); end play per maker | Nut left at seating torque or tightened to align the pin — preload. Readjust. Basis: ccd-0011133 |
| Wheel wobbles / clunk when rocked | Rock tire top-to-bottom; dial indicator | Dexter: 0.001–0.010 in (double-nut) | Nut backed off too far or bearing worn. Basis: Dexter 9-15K manual p.64 |
| Lug nuts loose after first trip | Torque at 10/25/50 miles | Lippert 14 in, 1/2 in studs: 90–120 ft-lb final | Skipped re-torque or wrong cone-angle nut. Basis: ccd-0011133 |
| Broken or stretched studs | Stud threads and length | Torque from chart, staged | Impact gun over-torque or single-stage tightening. Basis: ccd-0011133 |
At the Bay: Diagnose the Case
CASE 1 / 4
Hub runs hot after service
- Test
- Compare
- Correct
Select the next check
Basis: ccd-0011133. A likely cause is a hypothesis; confirm it with the applicable service procedure before repair.
Common Bay Mistakes
- ✕ Tightening the castle nut to line up the cotter pin — always back off.
- ✕ Running the spindle nut on with an impact gun.
- ✕ Leaving the nut at the 50 ft-lb initial torque.
- ✕ Using nuts that don't match the wheel's cone angle.
- ✕ Skipping the 10/25/50-mile re-torque.
Quick Check
Practice only — not scored.
Plan the Service Sequence
Planning practice only. Follow the applicable manufacturer's instructions, employer safety program and qualified supervision on real equipment.
Plan the first action. Compare the service steps with the bay mistakes.
Hands-on: Shop Test Equipment
Dial Indicator — Bearing End Play
Magnetic-base dial indicator (0.001 in) on the hub face, spindle nut adjustment
🛠 Equip your bay for this test →Symptom: Bearing service — set end play after repack.
Spec limits used
- 0.001–0.010 in — Allowable end play, double-nut wheel end (Dexter 9-15K service manual, p.64)
- 0.008 in — Nev-R-Lube 50 mm max axial end play (Dexter 059-831-00)
- illustrative only — Face runout limit (General shop practice)
Simulated readings for practice. Always follow the manufacturer's procedure and values on a real trailer.
Source: ccd-0011133 — 6-8