Identify Components and Remove the Hub Safely
- Name every wheel-end part before it comes apart
- Support the trailer on the frame, never on the axle
- Remove the hub without dropping or contaminating the outer bearing
- Wheel chocks — Block the tires that stay on the ground
- Rated jack and jack stands — Lift and support under the frame
- Lug wrench — Break lug nuts loose before lifting
- Dust-cap puller or soft pry tool — Remove the cap without bending it
- Needle-nose pliers / side cutters — Straighten and pull the cotter pin
- Clean shop towel / parts tray — Catch and protect the outer bearing
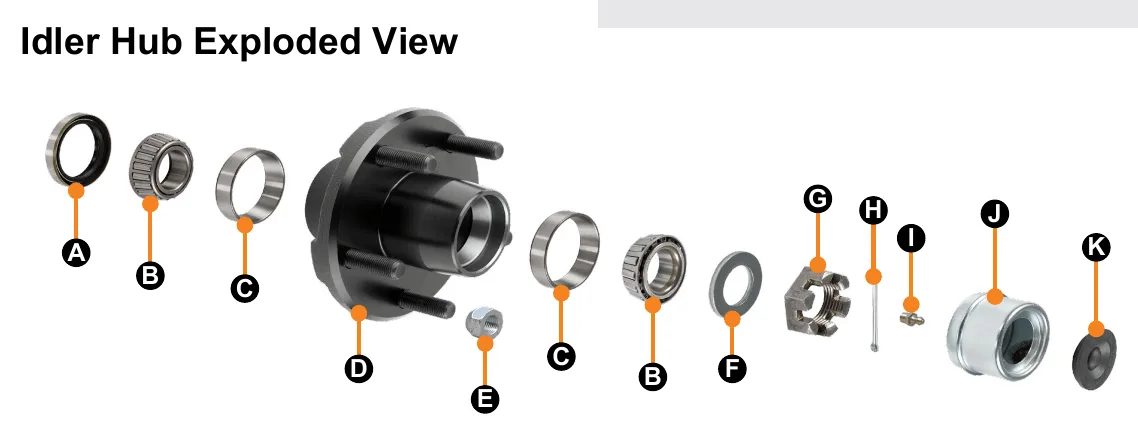
Identify the hub components before disassembly: bearing cones, bearing cups, grease seal, spindle washer, castle nut, cotter pin and dust cap. The exploded view is a general identification aid; actual assemblies can differ. Wear appropriate protective equipment, including eye protection, throughout service.
Position the trailer on level ground, prepare a clean place for removed components and chock the tires. Loosen the wheel lug nuts before lifting so the tire does not turn during loosening. Lift and support the trailer according to its manufacturer's instructions, using appropriately rated jack stands under the frame rather than the axle or suspension.
Remove the wheel and store it without leaning it against the trailer or a jack. Remove the dust cap, pull out the cotter pin and discard that pin. Remove the castle nut and spindle washer. Grease can hold the washer against the nut or outer bearing, so account for the washer rather than assuming it has already been removed.
Make sure the brakes are disengaged before withdrawing the hub. Support the hub and cover its nose to catch the outer bearing cone, then turn the hub slightly while pulling it from the spindle. Put the bearing in the clean parts area. The grease seal retains the inner bearing cone inside the hub.
How It Works
Why the outer bearing falls out
Nothing holds the outer cone in the hub except the spindle washer and nut. Once those are off, the cone is loose in its cup; tipping the hub can drop it on the floor, where grit embeds in the grease and rollers.
Why the inner bearing stays
The grease seal sits behind the inner cone and retains it in the hub. That is why the inner cone comes off with the hub and is only removed when the seal is removed.
Why loosen lugs on the ground
With the tire on the ground, friction stops the wheel from turning while you break the nuts loose. In the air, the wheel just spins (or you load the jack sideways).
Step-by-Step Procedure
0/7 doneFigures
Diagnostic Chart
| Symptom | Check | Spec / Expected | Likely cause & fix |
|---|---|---|---|
| Hub will not slide off | Brake shoe contact with the drum | Brakes disengaged before pulling the hub | Shoes adjusted out against a worn drum lip — back off the adjuster first. Basis: ccd-0011255 (brakes disengaged) |
| Washer missing after nut removal | Back of nut and face of outer bearing | Account for the washer | Grease holds the washer to the nut or bearing; find it before reassembly. Basis: ccd-0011255 |
| Grease on the backing plate or tire | Inner seal lip and spindle journal | No lubricant past the seal | Failed seal — plan seal replacement and check brake linings for contamination. Basis: General shop practice |
At the Bay: Diagnose the Case
CASE 1 / 3
Hub will not slide off
- Test
- Compare
- Correct
Select the next check
Basis: ccd-0011255 (brakes disengaged). A likely cause is a hypothesis; confirm it with the applicable service procedure before repair.
Common Bay Mistakes
- ✕ Placing jack stands under the axle tube or springs instead of the frame.
- ✕ Reusing the old cotter pin — it is discarded on removal.
- ✕ Leaning the removed wheel against the trailer or jack.
- ✕ Letting the outer bearing drop as the hub comes off.
Quick Check
Practice only — not scored.
Plan the Service Sequence
Planning practice only. Follow the applicable manufacturer's instructions, employer safety program and qualified supervision on real equipment.
Plan the first action. Compare the service steps with the bay mistakes.
Hands-on: Shop Test Equipment
Dial Indicator — Bearing End Play
Magnetic-base dial indicator (0.001 in) on the hub face, spindle nut adjustment
🛠 Equip your bay for this test →Symptom: Bearing service — set end play after repack.
Spec limits used
- 0.001–0.010 in — Allowable end play, double-nut wheel end (Dexter 9-15K service manual, p.64)
- 0.008 in — Nev-R-Lube 50 mm max axial end play (Dexter 059-831-00)
- illustrative only — Face runout limit (General shop practice)
Simulated readings for practice. Always follow the manufacturer's procedure and values on a real trailer.
Source: ccd-0011255 — 2-6