Inspect Bearings and Pack Them with Grease
- Recognize a bearing that cannot be reused
- Keep cones and cups matched
- Pack a bearing so every roller is filled
- Parts washer / solvent — Strip old grease
- Lint-free cloths — Dry without leaving fibers
- Brake cleaner + drip pan — Clean hub and cups
- Bearing packer (or gloved hand) — Force grease through the rollers
- NLGI No. 2 grease meeting spec — Lubricant per the axle maker
- Brass drift — Cup removal/installation (certified procedure)
- Nitrile gloves and eye protection — Chemical splash protection
Remove grease and oil from bearing cones with a suitable solvent, then dry them with a clean, lint-free cloth. Use appropriate protection against chemical splashes and skin exposure. Inspect the cages and rollers for pitting, spalling, corrosion, flat spots, discoloration and other abnormal conditions; reusable bearings should appear like new.
Inspect the bearing cups as carefully as the cones. Keep each used cone with its mating cup, because installed cones and cups are not interchangeable. A defective cone requires replacement of its cup as well, even when the cup appears sound. A sound cup may remain installed only when its matching cone is also reusable.
Clean the hub without scratching its raceways, apply brake cleaner and dry the hub and cups with lint-free cloths. Catch cleaner in a drip pan for proper disposal. Cup replacement is precision work: the source directs consultation with the manufacturer and use of a certified service center. Its described method uses a brass drift moved evenly around the cup, and the replacement cup must seat against the hub's retaining shoulder.
Before packing, remove old grease from the hub, bearings and spindle and clean the mating surfaces. Machine packing is preferred where possible, but hand packing is acceptable. For hand packing, press the bearing's wide end into grease in the palm, forcing grease between adjacent rollers, and turn the bearing to work around all rollers. Lightly grease the cup surface before installing the packed cone.
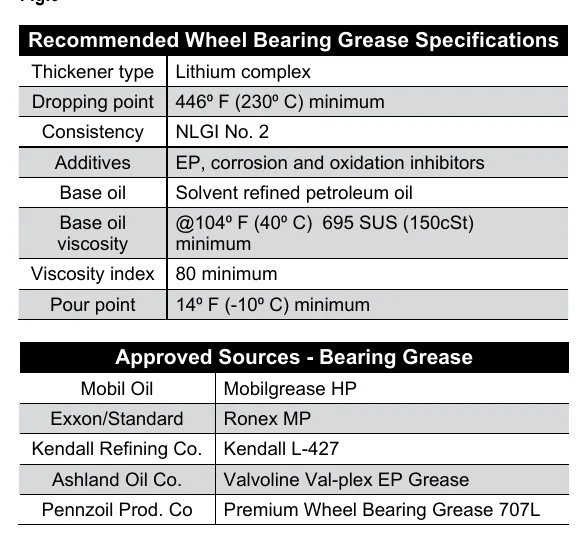
Select grease using the applicable product specification rather than appearance alone. Do not mix lithium, calcium, sodium or barium complex greases; completely remove the old grease when changing types. Lippert's supplied bearing-kit manual specifies physical inspection every 36,000 miles or 12 months, whichever occurs first, and annual lubrication inspection unless brake inspections reveal abnormal performance. Values and intervals vary by maker.
How It Works
How a tapered roller bearing carries load
The rollers ride between a cone (inner race) and a cup (outer race) at an angle, so each bearing carries both the trailer weight (radial load) and cornering push (thrust load). Two opposed bearings on the spindle share that work.
Why cups and cones stay paired
A cone and cup wear into each other as a set. A defective cone means its cup is replaced too, even if the cup looks good, because a new cone on a worn race will not share load evenly.
Why grease specs matter
Brake heat moves into the hub. Grease with too low a dropping point thins and runs out; mixing thickener types (lithium, calcium, sodium, barium) can break the grease down. Use the spec, not the color.
Step-by-Step Procedure
0/7 doneLippert bearing-kit examples; values vary by maker
| Physical bearing inspection | Every 36,000 miles or 12 months, whichever comes first. |
| Grease dropping point | 446°F (230°C) minimum. |
| Grease consistency | NLGI No. 2. |
| Grease viscosity index | 80 minimum. |
Figures
Diagnostic Chart
| Symptom | Check | Spec / Expected | Likely cause & fix |
|---|---|---|---|
| Flaking or pitted roller/race surface | Visual, cleaned and dried | Reusable bearings look like new | Spalling/pitting from fatigue or contamination — replace cone and cup. Basis: ccd-0011255; Timken damage guide |
| Blue/brown discoloration | Rollers and races | No discoloration | Overheating from lack of lubricant or overtightening — replace set, review adjustment. Basis: ccd-0011255; Timken damage guide |
| Evenly spaced dents in race | Cup raceway | Smooth race | Brinelling from impact (e.g. hammering) — replace set. Basis: Timken damage guide |
| Rust or etching | Rollers, cage, races | No corrosion | Water entry through a failed seal — replace set and seal. Basis: ccd-0011255 |
At the Bay: Diagnose the Case
CASE 1 / 4
Flaking or pitted roller/race surface
- Test
- Compare
- Correct
Select the next check
Basis: ccd-0011255; Timken damage guide. A likely cause is a hypothesis; confirm it with the applicable service procedure before repair.
Common Bay Mistakes
- ✕ Spinning a dry bearing with compressed air — it can fly apart and scores the rollers.
- ✕ Mixing cones and cups between hubs.
- ✕ Mixing grease types without removing all old grease.
- ✕ Smearing grease on the outside instead of forcing it between the rollers.
Quick Check
Practice only — not scored.
Plan the Service Sequence
Planning practice only. Follow the applicable manufacturer's instructions, employer safety program and qualified supervision on real equipment.
Plan the first action. Compare the service steps with the bay mistakes.
Hands-on: Shop Test Equipment
Dial Indicator — Bearing End Play
Magnetic-base dial indicator (0.001 in) on the hub face, spindle nut adjustment
🛠 Equip your bay for this test →Symptom: Bearing service — set end play after repack.
Spec limits used
- 0.001–0.010 in — Allowable end play, double-nut wheel end (Dexter 9-15K service manual, p.64)
- 0.008 in — Nev-R-Lube 50 mm max axial end play (Dexter 059-831-00)
- illustrative only — Face runout limit (General shop practice)
Simulated readings for practice. Always follow the manufacturer's procedure and values on a real trailer.
Source: ccd-0011255 — 6-9