Investigate Recurring Seal Leaks
- Distinguish seal damage from journal and bore defects.
- Select installation materials for the seal construction.
- Verify seal orientation, depth, and straightness.
- Seal removal tool — Remove the seal with the specified tool without driving it out through the inner bearing.
- Cleaning supplies and lint-free rags — Clean the spindle seal journal and hub bore so lubricant and debris do not hide damage.
- Inspection light — Illuminate seal lips, journal scratches, bore damage, and installation markings.
- Correctly sized seal driver — Apply installation force to the outer casing ring and guide the seal evenly into the bore.
- Depth gauge — Check seating depth and compare seal position around the casing using a consistent hub reference and the maker's inspection method.
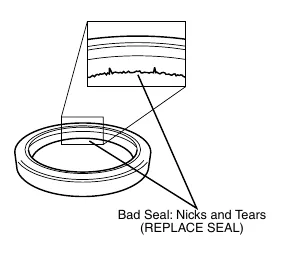
Inspect the seal whenever the hub is removed and replace it if its sealing condition is doubtful. Nicks and tears are direct evidence of damage, but the surrounding sealing surfaces also need examination.
Clean the spindle seal journal and hub seal bore before inspecting them. Deep journal scratches or gouges can cause seal failure, while bore damage can prevent lubricant retention. Replacing only the seal leaves these possible causes unaddressed.
Seal construction affects installation materials. The source calls for a thin exterior sealant film on the applicable seal, but not on a rubber-coated outside diameter; that style receives a thin oil film instead. Excess sealant must not contaminate the sealing lips.
Orientation, depth, and straightness are separate checks. Marked air sides face outward, the installation tool contacts the outer casing ring, and the seal must enter evenly without direct hammer blows. Dexter specifies installed seal flatness within 0.010 inch for the covered hubs and warns that a cocked seal is more likely to leak; values vary by maker.
How It Works
A recurring leak is not automatically a defective replacement seal
The seal lip depends on a sound spindle journal, while the seal exterior depends on a sound hub bore to retain lubricant. Deep journal scratches or gouges can compromise lip sealing, and bore damage can allow leakage around the seal exterior. Replacing the seal without examining these surfaces can leave the original failure mechanism in place.
Match installation material to seal construction
The lesson calls for a thin exterior sealant film on the applicable seal, but a rubber-coated outside diameter receives a thin oil film instead. These materials serve the exterior installation interface and must not be treated as interchangeable. Excess sealant reaching the sealing lips can interfere with their contact and contribute to leakage.
Orientation, depth, and straightness are independent
Marked air sides face outward, and installation force belongs on the outer casing ring rather than directly on the seal. A seal can face correctly yet still be cocked or installed excessively deep, causing uneven lip contact or interference with the inner bearing. Dexter specifies installed seal flatness within 0.010 inch for the covered hubs; installation depth remains application-specific, and values vary by maker.
Step-by-Step Procedure
0/7 doneDexter seal installation check; values vary by maker
| Installed seal flatness | Within 0.010 inch |
Figures
Diagnostic Chart
| Symptom | Check | Spec / Expected | Likely cause & fix |
|---|---|---|---|
| Leakage returns after seal replacement. | Inspect the removed seal for nicks, tears, and doubtful sealing condition; clean and inspect the spindle journal and hub bore before choosing a repair. | Replace a seal whose sealing condition is doubtful; examine surrounding sealing surfaces as well. | Seal damage, deep journal scratches or gouges, or bore damage may remain unresolved when only the seal is replaced. Basis: 9-15k complete service manual |
| Leakage appears around the seal exterior. | Examine the hub bore and identify the seal's outside construction; verify which installation material was used. | Use a thin exterior sealant film on the applicable seal, but a thin oil film on a rubber-coated outside diameter; keep excess sealant off the sealing lips. | Bore damage or an installation-material mismatch may compromise lubricant retention. Basis: 9-15k complete service manual |
| A newly installed seal appears uneven or leaks soon after installation. | Check the air-side marking and compare seating around the outer casing; confirm the driver contacted the outer casing ring. | Marked air sides face outward. Installed seal flatness: Within 0.010 inch for the covered Dexter hubs; values vary by maker. | Incorrect orientation, uneven entry, or direct hammer blows can leave the seal damaged or cocked. Basis: 9-15k complete service manual |
| The seal shows possible bearing-contact damage. | Verify installed depth against application-specific instructions and inspect for contact with the inner bearing. | Install to application-specific depth rather than automatically bottoming the seal; never drive it excessively deep. | Excessive installation depth can create interference with the inner bearing and damage the seal. Basis: 9-15k complete service manual |
At the Bay: Diagnose the Case
CASE 1 / 4
Leakage returns after seal replacement.
- Test
- Compare
- Correct
Select the next check
Basis: 9-15k complete service manual. A likely cause is a hypothesis; confirm it with the applicable service procedure before repair.
Common Bay Mistakes
- ✕ Replacing the seal without inspecting the cleaned journal and bore.
- ✕ Applying sealant to a rubber-coated outside diameter.
- ✕ Removing the seal by driving through the inner bearing.
- ✕ Hammering directly on the seal or assuming it must bottom out.
Quick Check
Practice only — not scored.
Plan the Service Sequence
Planning practice only. Follow the applicable manufacturer's instructions, employer safety program and qualified supervision on real equipment.
Plan the first action. Compare the service steps with the bay mistakes.
Source: 9-15k complete service manual — 62-63