Select and Apply U-Bolt Torque
- Match axle capacity and installed hardware to the applicable torque entry.
- Replace removed U-bolts and hardware using an even tightening sequence.
- Apply the selected torque and recognize unsafe configuration mismatches.
- Torque wrench — Apply the manufacturer's matching final torque specification.
- Sockets and ratchet — Remove old nuts and advance new nuts evenly after starting them by hand.
- Floor jack — Lift the trailer at manufacturer-approved frame locations.
- Jack stands — Support the trailer by its frame according to the manufacturer's requirements; do not rely on the jack alone.
- Wheel chocks — Help prevent unintended trailer movement during lifting and service.
- Caliper — Check U-bolt diameter when hardware size is a condition of the applicable torque entry.
U-bolt torque is a component-specific requirement, not a universal axle value. Match the axle capacity and any listed hardware size, finish, or spring-orientation condition before choosing a chart entry. Values vary by maker and configuration.
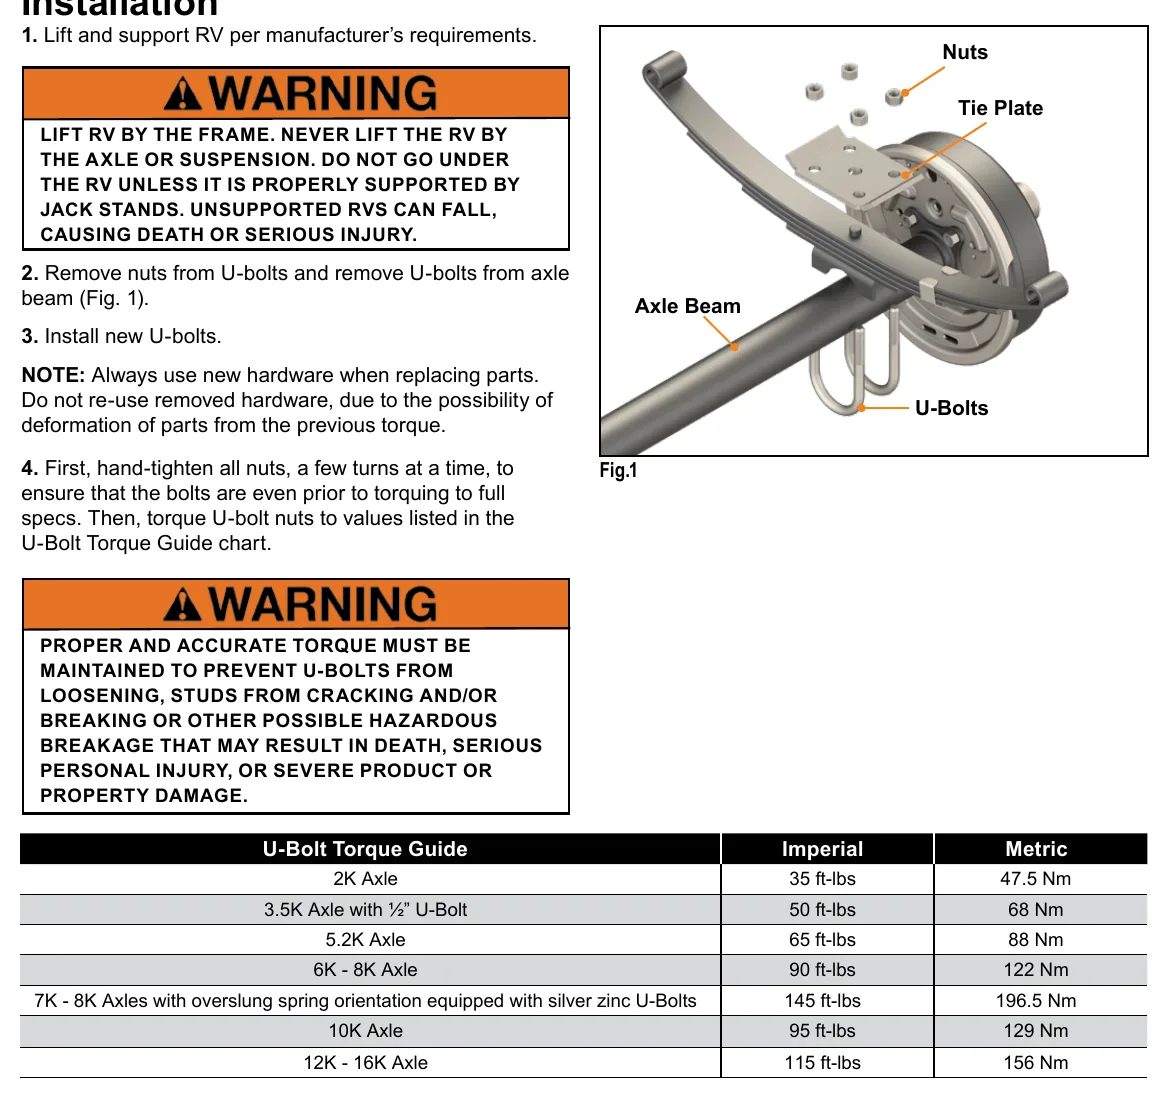
Replace removed U-bolts and associated hardware with new hardware. The installation manual warns that previously tightened parts may have deformed, making reuse unsuitable.
Start all nuts by hand and advance them a few turns at a time so the U-bolts remain even before final torque. Correct torque helps prevent loosening and hazardous fastener cracking or breakage.
For example, Lippert lists 90 ft-lb for the general 6K–8K axle entry, but 145 ft-lb for its specified 7K–8K overslung arrangement with silver zinc U-bolts. These are application-specific examples, not interchangeable settings or universal values.
How It Works
Select by configuration, not capacity alone
Identify axle capacity, then match any listed U-bolt size, finish, and spring-orientation conditions in the applicable manufacturer's guide. Lippert lists 90 ft-lb for its general 6K–8K entry but 145 ft-lb for its specified 7K–8K overslung arrangement with silver zinc U-bolts; these settings are not interchangeable.
Torque creates clamp load through friction
Tightening stretches the fastener and develops the clamping force that holds the suspension joint together, while thread and bearing-surface friction affect how torque becomes clamp load. Insufficient clamping can permit movement and loosening, while excessive loading can contribute to cracking or breakage. Previously tightened parts may have deformed, so removed U-bolts and associated hardware must be replaced rather than reused.
Even installation precedes final torque
Lift and support the trailer by its frame according to the manufacturer's requirements before removing the old hardware. Install new hardware, start all nuts by hand, and advance them a few turns at a time to keep the U-bolts even. Apply the matching final specification with a torque wrench rather than treating an uneven assembly as ready for final tightening.
Step-by-Step Procedure
0/6 doneLippert U-bolt examples; values vary by maker and configuration
| 2K axle | 35 ft-lb |
| 3.5K axle with 1/2-inch U-bolt | 50 ft-lb |
| 5.2K axle | 65 ft-lb |
| 6K–8K axle, general chart entry | 90 ft-lb |
| 7K–8K axle, overslung springs with silver zinc U-bolts | 145 ft-lb |
| 10K axle | 95 ft-lb |
| 12K–16K axle | 115 ft-lb |
Figures
Diagnostic Chart
| Symptom | Check | Spec / Expected | Likely cause & fix |
|---|---|---|---|
| Different torque entries appear to apply to the same axle capacity. | Compare the installed spring orientation and U-bolt finish with the conditions attached to each chart entry. | Lippert general 6K–8K entry: 90 ft-lb; specified 7K–8K overslung springs with silver zinc U-bolts: 145 ft-lb. | Selecting by axle capacity alone overlooks a configuration-specific requirement. Basis: ccd-0011257 |
| Removed U-bolts and nuts are being considered for reinstallation. | Confirm that replacement U-bolts and associated hardware are new before assembly. | Replace removed U-bolts and associated hardware with new hardware. | Previously tightened hardware may have deformed, making reuse unsuitable. Basis: ccd-0011257 |
| U-bolts become uneven as the nuts are tightened. | Check whether all nuts were started by hand and advanced a few turns at a time before final torque. | Keep the U-bolts even before final torque. | Advancing a nut too far ahead of the others can draw the assembly down unevenly. Basis: ccd-0011257 |
| Installed U-bolts are loose, cracked, or broken. | Compare the torque used with the applicable manufacturer's entry for the actual axle and hardware configuration; do not assume tightening alone corrects damaged hardware. | Never substitute a torque value from a different configuration; replace removed U-bolts and associated hardware. | Incorrect torque can allow loosening or contribute to hazardous fastener cracking or breakage. Basis: ccd-0011257 |
At the Bay: Diagnose the Case
CASE 1 / 4
Different torque entries appear to apply to the same axle capacity.
- Test
- Compare
- Correct
Select the next check
Basis: ccd-0011257. A likely cause is a hypothesis; confirm it with the applicable service procedure before repair.
Common Bay Mistakes
- ✕ Treating axle capacity as the only torque-selection condition.
- ✕ Substituting a familiar torque value from another configuration.
- ✕ Reusing removed U-bolts because they look serviceable.
- ✕ Fully tightening a nut while the remaining nuts are still loose.
Quick Check
Practice only — not scored.
Plan the Service Sequence
Planning practice only. Follow the applicable manufacturer's instructions, employer safety program and qualified supervision on real equipment.
Plan the first action. Compare the service steps with the bay mistakes.
Hands-on: Shop Test Equipment
Dial Indicator — Bearing End Play
Magnetic-base dial indicator (0.001 in) on the hub face, spindle nut adjustment
🛠 Equip your bay for this test →Symptom: Bearing service — set end play after repack.
Spec limits used
- 0.001–0.010 in — Allowable end play, double-nut wheel end (Dexter 9-15K service manual, p.64)
- 0.008 in — Nev-R-Lube 50 mm max axial end play (Dexter 059-831-00)
- illustrative only — Face runout limit (General shop practice)
Simulated readings for practice. Always follow the manufacturer's procedure and values on a real trailer.
Source: ccd-0011257 — 2-3