Service Double-Eye Leaf Springs
- Support the frame and axle safely while protecting wiring and hoses.
- Inspect spring connections and install the replacement spring in the documented orientation.
- Verify clamp alignment, lubrication, line restoration, and wheel installation.
- Rated jack stands — Support the trailer frame independently of the axle being serviced.
- Floor jack — Support the axle separately and control its lowering and raising.
- Socket and wrench set — Remove wheels and spring hardware, holding spring and shackle bolt heads while loosening their nuts.
- Torque wrench — Apply the applicable documented tightening requirements; obtain the specified values and sequences before final tightening.
- Grease gun — Apply fresh grease to wet-bolt connections as specified while protecting the fittings.
Begin with the trailer frame safely supported and the axle weight separately supported. Remove the affected axle's wheels and check whether wiring or hoses permit the required axle movement. Hold bolt heads while loosening spring and shackle nuts.
Inspect removed spring-bolt threads for damage. The documented procedure calls for replacing damaged spring bolts and replacing a shackle-link assembly if its bolt threads are damaged. Inspect shackle links for wear and preserve their original orientation during reinstallation.
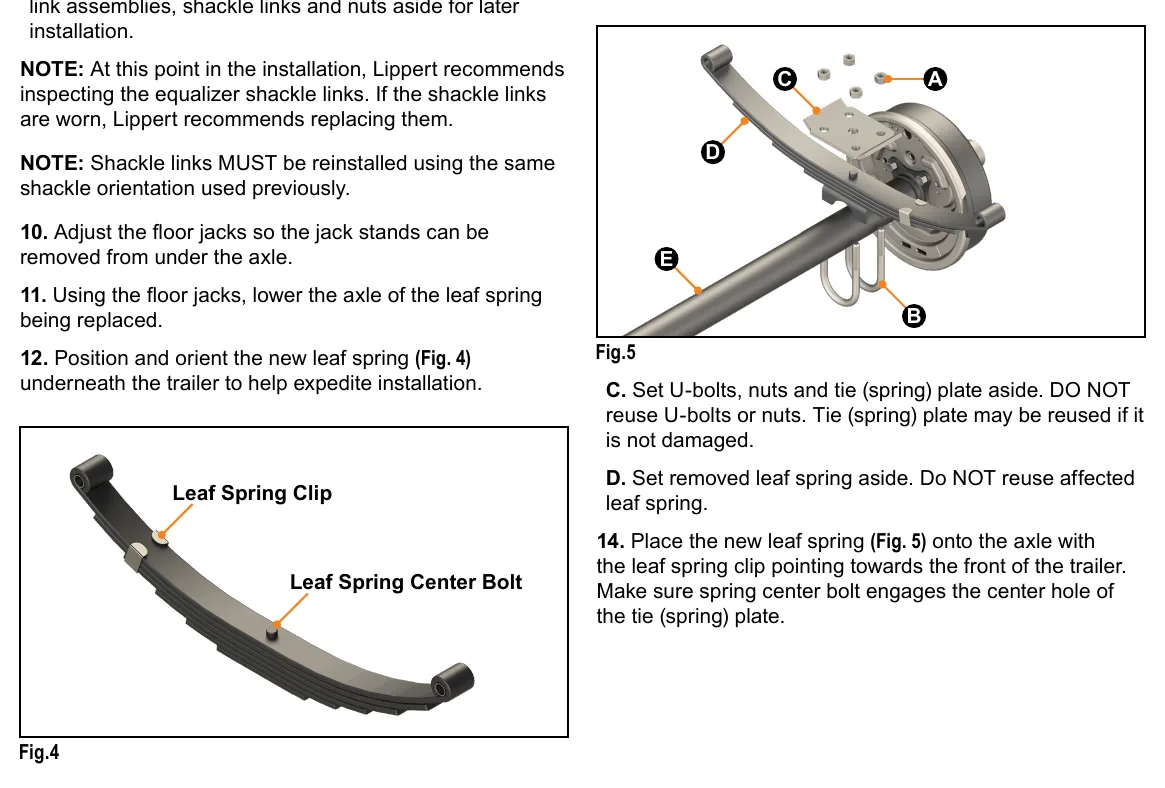
After lowering the axle and removing the spring clamp hardware, discard the removed U-bolts and nuts. The tie plate may be reused if undamaged. In this documented arrangement, install the new spring with its clip toward the trailer front and its center bolt engaged in the tie plate's center hole.
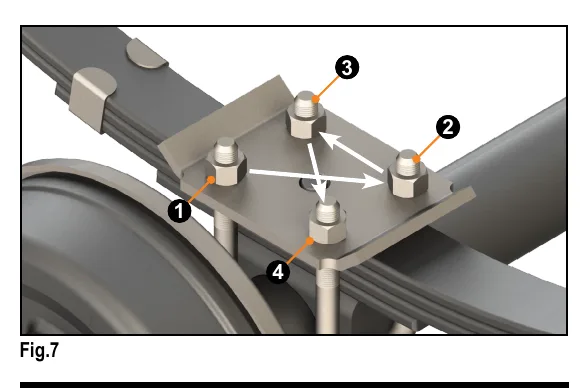
Install new clamp hardware, start the nuts by hand, and verify spring squareness, straight U-bolts, and approximately equal exposed threads. Tighten progressively in the specified criss-cross pattern. During reassembly, protect wet-bolt grease fittings, apply fresh grease as specified, reconnect any disconnected lines, and reinstall wheels using the applicable staged torque sequence.
How It Works
Control the load before disconnecting the spring
Support the trailer frame safely and support the axle weight separately before removing wheels and disconnecting spring hardware. Check wiring and hose clearance before moving the axle, because an uncontrolled drop can pull on lines and damage their connections.
Inspect connections and preserve orientation
Hold bolt heads while loosening spring and shackle nuts, then inspect removed bolt threads and shackle links for damage or wear. Replace damaged spring bolts and replace a shackle-link assembly if its bolt threads are damaged; preserve the original shackle-link orientation during reinstallation. In this documented arrangement, the replacement spring clip faces the trailer front and the spring center bolt engages the tie plate's center hole.
Establish alignment before final tightening
Discard removed U-bolts and nuts, reuse the tie plate only if undamaged, and start the new clamp nuts by hand. Verify spring squareness, straight U-bolts, and approximately equal exposed threads, then tighten progressively in the specified criss-cross pattern so the clamp seats evenly. Protect and grease wet bolts as directed, reconnect disconnected lines, purge disconnected hydraulic lines of air, and reinstall wheels using the applicable staged torque procedure; the supplied lesson does not provide torque values.
Step-by-Step Procedure
0/7 doneFigures
Diagnostic Chart
| Symptom | Check | Spec / Expected | Likely cause & fix |
|---|---|---|---|
| Brake wiring or hoses become taut as the axle is lowered. | Stop axle movement, maintain separate axle support, and inspect line routing and available clearance. | Wiring and hoses must permit the required axle movement; do not allow an unsupported axle to drop against them. | Insufficient line clearance or uncontrolled axle movement is loading the wiring or hoses. Basis: ccd-0011277 |
| Removed spring or shackle bolt threads show damage. | Inspect the removed spring-bolt threads and the shackle-link assembly's bolt threads; also inspect shackle links for wear. | Replace damaged spring bolts and replace a shackle-link assembly if its bolt threads are damaged. | Damaged threads make the connection unsuitable for reuse under the documented procedure. Basis: ccd-0011277 |
| The spring sits crooked or exposed U-bolt threads appear uneven during assembly. | Before final tightening, verify center-bolt engagement, spring squareness, U-bolt straightness, and exposed-thread balance. | The center bolt must engage the tie plate's center hole; the spring must be square, U-bolts straight, and exposed threads approximately equal. | The spring or clamp hardware may not be seated and aligned correctly. Basis: ccd-0011277 |
| Hydraulic brake response feels spongy after a line was disconnected. | Inspect the restored connections for leaks and verify that air has been purged using the applicable brake-service procedure. | Purge hydraulic lines of air if disconnected. | Air introduced during disconnection can compress under brake pressure and reduce effective hydraulic force transmission. Basis: ccd-0011277 |
At the Bay: Diagnose the Case
CASE 1 / 4
Brake wiring or hoses become taut as the axle is lowered.
- Test
- Compare
- Correct
Select the next check
Basis: ccd-0011277. A likely cause is a hypothesis; confirm it with the applicable service procedure before repair.
Common Bay Mistakes
- ✕ Reusing removed U-bolts or nuts because they look serviceable.
- ✕ Letting axle weight hang from brake wiring or hoses.
- ✕ Reversing shackle links or overlooking the documented front-facing spring clip.
- ✕ Guessing torque values or treating equal exposed threads as proof of final tightness.
Quick Check
Practice only — not scored.
Plan the Service Sequence
Planning practice only. Follow the applicable manufacturer's instructions, employer safety program and qualified supervision on real equipment.
Plan the first action. Compare the service steps with the bay mistakes.
Hands-on: Shop Test Equipment
Dial Indicator — Bearing End Play
Magnetic-base dial indicator (0.001 in) on the hub face, spindle nut adjustment
🛠 Equip your bay for this test →Symptom: Bearing service — set end play after repack.
Spec limits used
- 0.001–0.010 in — Allowable end play, double-nut wheel end (Dexter 9-15K service manual, p.64)
- 0.008 in — Nev-R-Lube 50 mm max axial end play (Dexter 059-831-00)
- illustrative only — Face runout limit (General shop practice)
Simulated readings for practice. Always follow the manufacturer's procedure and values on a real trailer.
Source: ccd-0011277 — 2-6