Measure Centerline, Thrust, and Scrub Relationships
- Select the applicable alignment procedure without mixing limits.
- Measure and correct centerline, thrust, and scrub relationships in sequence.
- Recognize reference-point and tape-tension errors.
- Measuring tape — Compare hitch-to-front-axle and interaxle distances at the specified axle references.
- Tensioning scale — Maintain equal tape pulling force when measuring A and B.
- Plumb bob — Transfer specified reference locations to a suitable floor when needed, without substituting different measurement points.
- Chalk or marking pencil — Identify transferred references and label measurement locations to prevent side-to-side confusion.
- Wheel chocks — Help prevent unintended trailer movement during measurement.
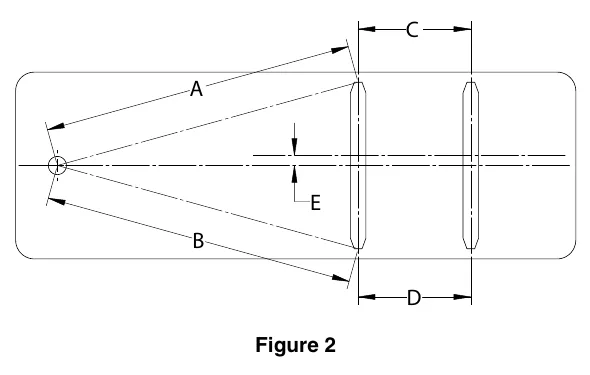
Begin with lateral centerline relationship E, which compares the trailer-body and axle centerlines. In the Dexter heavy-duty procedure, correct each axle to an offset of 1/4 inch or less before evaluating thrust and scrub relationships. These limits are application-specific; values vary by maker.
Measure A on the curbside and B on the roadside from the kingpin or coupler to the front axle references. Dexter specifies agreement within 0.1 degree or 1/8 inch for this heavy-duty thrust check. Maintain the same tape pulling force for both readings, using a tensioning scale or optical measurement to support accuracy.
Measure C and D between the front and rear axles on the curbside and roadside. Dexter specifies agreement within 1/16 inch for this heavy-duty scrub check and calls for the difference to be as close to zero as possible. Smaller offset reduces rolling resistance and improves fuel economy. Align succeeding axles to the front axle rather than independently to the hitch.
Do not interchange limits from different sections. Dexter's general axle-installation section specifies a maximum 1/16-inch difference for kingpin-to-axle-end measurements and a maximum 1/8-inch difference for interaxle measurements, unlike the heavy-duty procedure above. Use the applicable procedure rather than combining these limits; values vary by maker.
How It Works
Select the procedure and establish centerline
Confirm which maker's procedure applies before judging any measurement; Dexter's heavy-duty and general installation limits are not interchangeable. Begin the heavy-duty sequence with E, the lateral relationship between trailer-body and axle centerlines, and correct each axle to 1/4 inch or less before evaluating thrust or scrub. Centering establishes the required lateral relationship but does not, by itself, prove that an axle points in the correct direction.
Thrust: compare the front axle to the hitch
Measure A on the curbside and B on the roadside from the kingpin or coupler to the specified front axle references; the Dexter heavy-duty criterion is agreement within 0.1 degree or 1/8 inch. Maintain equal tape pulling force with a tensioning scale, or use optical measurement, because inconsistent tension can change tape sag and distort the comparison. An angled front axle directs its rolling path away from the intended trailer travel direction and becomes a poor reference for succeeding axles.
Scrub: compare succeeding axles to the front axle
Measure C and D between the front and rear axles on the curbside and roadside; Dexter's heavy-duty criterion is agreement within 1/16 inch, with the difference as close to zero as possible. Align succeeding axles to the front axle rather than independently to the hitch, because axles pointing in different directions force tire tread to slip against the road, increasing wear and rolling resistance. Dexter's general installation limits instead allow no more than 1/16 inch for kingpin-to-axle-end difference and no more than 1/8 inch for interaxle difference; do not combine those limits with the heavy-duty procedure.
Step-by-Step Procedure
0/7 doneDexter alignment limits by procedure; values vary by maker
| Heavy-duty lateral centerline E | 1/4 inch or less for each axle |
| Heavy-duty thrust A versus B | Within 0.1 degree or 1/8 inch |
| Heavy-duty scrub C versus D | Within 1/16 inch; as close to zero difference as possible |
| General installation: kingpin-to-axle-end difference | No more than 1/16 inch |
| General installation: interaxle measurement difference | No more than 1/8 inch |
Figures
Diagnostic Chart
| Symptom | Check | Spec / Expected | Likely cause & fix |
|---|---|---|---|
| An axle appears laterally displaced beneath the trailer. | Measure E between the trailer-body and axle centerlines for each axle before judging thrust or scrub. | Heavy-duty E: 1/4 inch or less for each axle. | The axle may be laterally offset even if other distance comparisons appear acceptable. Basis: 9-15k complete service manual |
| A and B disagree or change when repeated. | Confirm the specified front axle references and the hitch reference, then repeat curbside and roadside measurements with equal tape tension or optical measurement. | Heavy-duty A versus B: within 0.1 degree or 1/8 inch. | Possible front axle thrust misalignment, inconsistent tape pulling force, or use of incorrect references. Basis: 9-15k complete service manual |
| C and D disagree after the front axle has been aligned. | Compare curbside and roadside interaxle distances at the specified references; align the rear and succeeding axles to the front axle. | Heavy-duty C versus D: within 1/16 inch; as close to zero difference as possible. | A succeeding axle may not be aligned with the front axle, creating scrub and increased rolling resistance. Basis: 9-15k complete service manual |
| The same measurements receive conflicting pass or fail decisions. | Identify whether the job uses the heavy-duty procedure or general axle-installation procedure, and apply that procedure consistently. | General installation: kingpin-to-axle-end difference no more than 1/16 inch; interaxle difference no more than 1/8 inch. | Limits from different manual sections may have been interchanged. Basis: 9-15k complete service manual |
At the Bay: Diagnose the Case
CASE 1 / 4
An axle appears laterally displaced beneath the trailer.
- Test
- Compare
- Correct
Select the next check
Basis: 9-15k complete service manual. A likely cause is a hypothesis; confirm it with the applicable service procedure before repair.
Common Bay Mistakes
- ✕ Checking thrust or scrub before correcting E.
- ✕ Substituting rims, hubcaps, brake drums, suspension brackets, or vent holes for specified axle references.
- ✕ Pulling the tape differently for A and B.
- ✕ Mixing procedure limits or aligning succeeding axles independently to the hitch.
Quick Check
Practice only — not scored.
Plan the Service Sequence
Planning practice only. Follow the applicable manufacturer's instructions, employer safety program and qualified supervision on real equipment.
Plan the first action. Compare the service steps with the bay mistakes.
Source: 9-15k complete service manual — 65, 72-73