Isolate Low-Current and Short-Circuit Faults
- Begin diagnosis with controller testing and adjustment.
- Distinguish low-current faults from possible shorts.
- Isolate trailer wiring faults before replacing components.
- Digital multimeter — Measure voltage and check continuity with power isolated, following the controller manufacturer's procedures.
- DC clamp ammeter — Measure brake-circuit current around an individual conductor using the source testing procedures.
- Inspection light — Locate damaged insulation, loose connections, and wiring contacting grounded metal.
- Basic hand tools — Access wiring and disconnect circuit sections with power isolated.
- Wire stripper and crimper — Repair identified wiring faults with suitable connectors and seal the connection points.
Begin electrical troubleshooting at the controller and use its manufacturer's adjustment and testing instructions. Many complaints of harsh or malfunctioning brakes are associated with an incorrectly adjusted or nonfunctioning controller.
Low or absent voltage and current can result from poor connections, open circuits, insufficient wire size, broken wires, blown fuses, or faulty controllers or resistors. These possibilities call for inspection and measurement rather than an immediate assumption that a magnet has failed.
Abnormally high system current can indicate a short or partial short. Listed causes include shorted magnet coils, a defective controller, and bare wires contacting a grounded object.
Isolate the circuit in sections. If unplugging the trailer makes the abnormally high current fall to zero, the short is in the trailer; if current remains high with all brake magnets disconnected, the short is in the trailer wiring.
How It Works
Start at the controller
The controller governs the electrical output delivered to the brake magnets, so incorrect adjustment or controller failure can produce harsh or malfunctioning brakes. Begin with its manufacturer's testing and adjustment instructions, and inspect for obvious mechanical faults rather than assuming every braking complaint is electrical.
Interpret low readings before replacing parts
Poor connections and insufficient wire size add resistance, which can reduce the voltage and current available to the magnets under load. Open circuits, broken wires, blown fuses, and faulty controllers or resistors can also produce low or absent readings, so measurements and inspection should guide diagnosis instead of immediate magnet replacement.
Use isolation to locate excessive current
A short or partial short can create an unintended low-resistance path and cause abnormally high current. If unplugging the trailer makes that current fall to zero, the short is in the trailer; if current remains high with all brake magnets disconnected, the short is in the trailer wiring. Isolate power before changing connections, then test in accordance with the source procedures.
Step-by-Step Procedure
0/7 doneFigures
Diagnostic Chart
| Symptom | Check | Spec / Expected | Likely cause & fix |
|---|---|---|---|
| Harsh or malfunctioning brakes | Start with the controller manufacturer's testing and adjustment instructions; also inspect for obvious mechanical faults. | Use the controller manufacturer's adjustment and testing requirements; the lesson gives no numerical setting. | An incorrectly adjusted or nonfunctioning controller may be responsible. Basis: LDServiceOnline |
| Low or absent voltage and current | Measure using the source procedures, then inspect connections, wiring condition, wire size, fuses, and controller or resistor operation. | Compare readings with the applicable source procedures; the lesson supplies no numerical voltage or current limits. | Poor connections, open circuits, insufficient wire size, broken wires, blown fuses, or faulty controllers or resistors. Basis: LDServiceOnline |
| Abnormally high system current | Unplug the trailer as part of the circuit-isolation procedure and observe the current result. | If abnormally high current falls to zero with the trailer unplugged, the short is in the trailer. | Possible short or partial short, including shorted magnet coils or bare wires contacting a grounded object; a defective controller is also a listed cause of high system current. Basis: LDServiceOnline |
| High current persists with all brake magnets disconnected | Confirm all brake magnets are disconnected, then use sectional isolation and inspection to locate the trailer-wiring fault. | Current remaining high with all brake magnets disconnected identifies a short in the trailer wiring. | A trailer-wiring short, such as bare wire contacting a grounded object. Basis: LDServiceOnline |
At the Bay: Diagnose the Case
CASE 1 / 4
Harsh or malfunctioning brakes
- Test
- Compare
- Correct
Select the next check
Basis: LDServiceOnline. A likely cause is a hypothesis; confirm it with the applicable service procedure before repair.
Common Bay Mistakes
- ✕ Replacing magnets before checking the controller and supply circuit.
- ✕ Treating every braking complaint as electrical and overlooking mechanical faults.
- ✕ Changing connections while energized or improvising beyond the source test procedures.
- ✕ Leaving repaired connections unsealed or continuing beyond your skill level instead of seeking professional assistance.
Quick Check
Practice only — not scored.
Plan the Service Sequence
Planning practice only. Follow the applicable manufacturer's instructions, employer safety program and qualified supervision on real equipment.
Plan the first action. Compare the service steps with the bay mistakes.
Hands-on: Test Bench Practice
Symptom: Healthy trailer. Learn what good readings look like.
Tap a point to place the red probe.
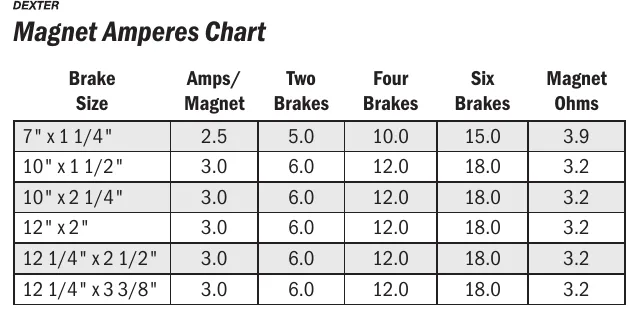
Good system: ~12.6 V at pins, 3.2 Ω across a 12×2-inch magnet (unplugged), 3.0 A per magnet at 12 V full gain, and at least 10.5 V at the magnet — the chart values from the axle manuals.
Hands-on: Shop Test Equipment
IPA #9107B Electric Brake Force Meter
Plugs into the truck's 7-way socket on a 25 ft cable; simulates a trailer load and shows controller output on 10 blue LEDs
🛠 Equip your bay for this test →Symptom: Customer wants the truck checked before buying a trailer.
Spec limits used
- 1–10, each 1.0–1.5 V — Gain LEDs (IPA #9107B manual, p.5)
- 15 s — Max time holding brake pedal (IPA #9107B manual, p.4)
- set-up step 5 — Connect the 9-pin only after the engine is running (IPA #9107B manual, p.3)
- hold brake pedal during ECU detection — 2016–2017 'Trailer Connected' not shown (IPA #9107B manual, p.3)
- faulty brake control module or relay — ECU light never lights on a vehicle with a controller (IPA #9107B manual, p.5)
Simulated readings for practice. Always follow the manufacturer's procedure and values on a real trailer.
Hands-on: Wire-Trace Overlay
Pin 2 · Blue
Electric brakes
- Left and right brake magnets
- Breakaway switch output
Check points
- Two brakes draw about 6.0 A (3.0 A per magnet) at 12 V full gain.
- Unplugged: 3.2 Ω per magnet; at least 10.5 V at each magnet under load.
Common failures
- Open magnet: about half the expected current and a pull to one side.
- Shorted magnet: very low resistance and controller overload.
- Wire chafed where it drops to the axle.
Colors shown are the most common RV harness colors; makers vary — always verify against the trailer's wiring diagram.
Source: LDServiceOnline — 18-23