Install, Torque, and Recheck Wheel Fasteners
- Verify fastener fit and start every fastener by hand.
- Apply assembly-specific torque stages in the prescribed sequence.
- Complete and document the applicable torque rechecks.
- Torque wrench — Apply each specified torque stage using a wrench suitable for the required range.
- Correctly fitting wheel-fastener socket — Engage the fastener securely without damaging its wrenching surfaces.
- Shop light — Inspect wheel seats, fastener seating surfaces, and visible threads before installation.
- Shop towels — Remove loose dirt from accessible mating surfaces so contamination does not interfere with seating.
- Inspection mirror — Help inspect obstructed seating areas while checking wheel and fastener fit.
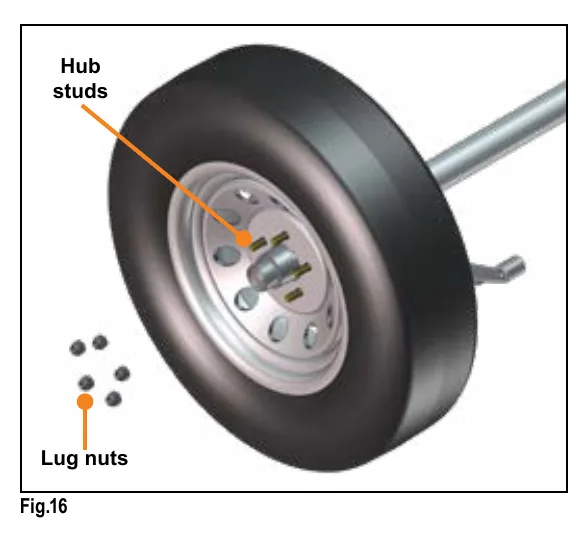
After reinstalling the wheel on the hub, use fasteners whose cone angle matches the wheel. Start every bolt or nut by hand to prevent cross-threading. Continue hand-tightening in the specified sequence before applying staged torque.
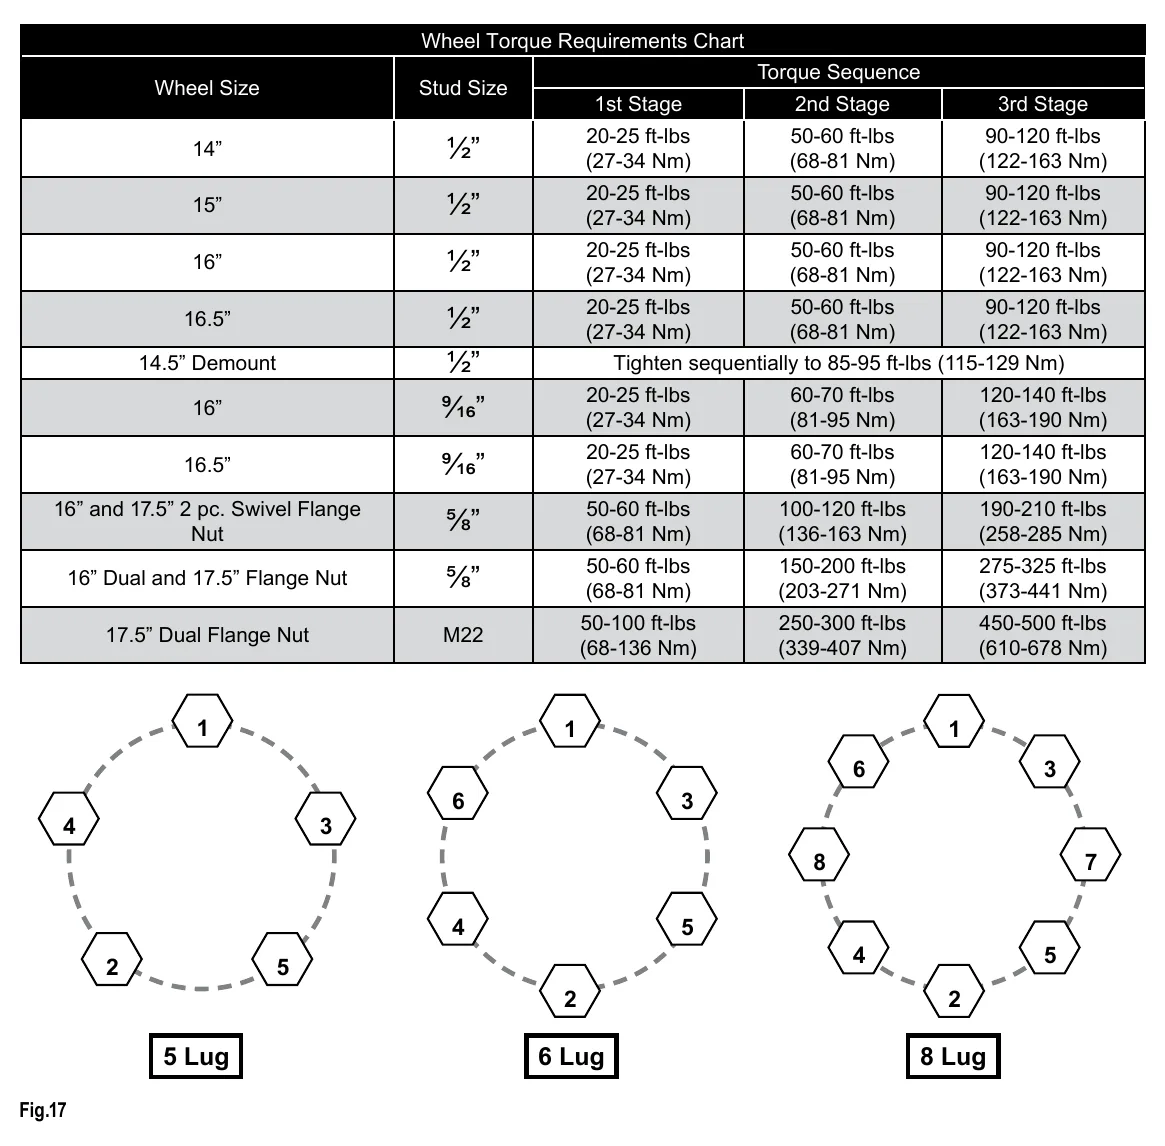
Use a torque wrench to apply the required wheel-fastener torque. The supplied procedure requires this method rather than an alternative tightening method. Follow the sequence illustrated for the applicable lug arrangement instead of inventing a tightening order.
For the listed 15-inch wheel with 1/2-inch studs, Lippert specifies stages of 20-25 ft-lb, 50-60 ft-lb, and 90-120 ft-lb. This example teaches how to read successive stages, not a universal setting. Values vary by maker and assembly.
Torque the fasteners before first road use and after every wheel removal. Lippert specifies checks and re-torque after 10, 25, and 50 miles, followed by periodic checks during regular service. Values and intervals vary by maker. Correct torque must be maintained to prevent loose wheels and cracked or broken studs.
How It Works
Correct seating begins before torque
The fastener cone angle must match the wheel so the seating surfaces bear against each other correctly. Start every fastener by hand and continue hand-tightening in the prescribed sequence; resistance during starting is a reason to investigate, not to force the fastener with a wrench.
Sequence and stages establish clamp load
Tightening in the illustrated sequence and successive stages helps seat the wheel evenly while developing the clamp load that holds the joint together. For the listed 15-inch wheel with 1/2-inch studs, the Lippert example specifies 20-25 ft-lb, then 50-60 ft-lb, then 90-120 ft-lb using a torque wrench. These are assembly-specific example values, not universal wheel settings.
Rechecks protect the assembled joint
Contact surfaces can settle after installation, reducing clamp load and allowing movement that promotes loosening and stud fatigue. Apply the required torque before first road use and after every wheel removal; Lippert specifies rechecks after 10, 25, and 50 miles, followed by periodic checks during regular service. Confirm the applicable maker's requirements because torque values and intervals vary, and incorrect or unmaintained torque can lead to wheel loss or cracked or broken studs.
Step-by-Step Procedure
0/8 doneLippert installation example; values and intervals vary by maker
| 15-inch wheel, 1/2-inch studs: first stage | 20-25 ft-lb |
| 15-inch wheel, 1/2-inch studs: second stage | 50-60 ft-lb |
| 15-inch wheel, 1/2-inch studs: final stage | 90-120 ft-lb |
| Post-installation torque rechecks | 10, 25, and 50 miles |
Figures
Diagnostic Chart
| Symptom | Check | Spec / Expected | Likely cause & fix |
|---|---|---|---|
| A fastener binds before it can be started properly by hand. | Stop installation and inspect thread condition, alignment, and fastener compatibility before attempting to tighten it again. | Start every bolt or nut by hand to prevent cross-threading. | Possible cross-threading, damaged threads, contamination, or an incompatible fastener. Basis: ccd-0011134 |
| The fastener does not appear to seat correctly against the wheel. | Verify the fastener cone angle against the wheel requirement rather than judging compatibility by thread fit alone. | Use fasteners whose cone angle matches the wheel. | A mismatched cone angle can produce improper contact and unreliable clamping. Basis: ccd-0011134 |
| The wheel was tightened without a verified sequence or torque stages. | Identify the applicable assembly procedure and complete its prescribed hand-tightening sequence and torque-wrench stages before road use. | Lippert example only: 15-inch wheel with 1/2-inch studs; 20-25 ft-lb, 50-60 ft-lb, and 90-120 ft-lb. | An invented tightening order or alternative tightening method does not establish compliance with the supplied procedure. Basis: ccd-0011134 |
| A torque recheck is due or its completion cannot be confirmed. | Verify mileage since installation and the applicable maker's requirements; complete and record the required check and re-torque. | Lippert rechecks: 10, 25, and 50 miles, followed by periodic checks during regular service. | Missed rechecks can leave loss of clamp load undetected. Basis: ccd-0011134 |
At the Bay: Diagnose the Case
CASE 1 / 4
A fastener binds before it can be started properly by hand.
- Test
- Compare
- Correct
Select the next check
Basis: ccd-0011134. A likely cause is a hypothesis; confirm it with the applicable service procedure before repair.
Common Bay Mistakes
- ✕ Treating the Lippert example as a universal torque setting.
- ✕ Using a powered tool to force a reluctant fastener onto its threads.
- ✕ Inventing a tightening order instead of following the applicable illustration.
- ✕ Assuming installation torque eliminates the need for mileage rechecks.
Quick Check
Practice only — not scored.
Plan the Service Sequence
Planning practice only. Follow the applicable manufacturer's instructions, employer safety program and qualified supervision on real equipment.
Plan the first action. Compare the service steps with the bay mistakes.
Source: ccd-0011134 — 8-9