Read Tire Wear and Wheel Attachment Evidence
- Connect tread wear patterns to likely causes and targeted checks.
- Verify wheel, tire, and fastener compatibility before installation.
- Apply hardware-specific tightening and follow-up inspection requirements.
- Tire pressure gauge — Measure cold inflation and compare it with the tire manufacturer's recommendation for the load.
- Tread depth gauge — Compare tread depth across and around the tire to document wear patterns.
- Inspection light — Examine tread, wheel markings, fastener seats, and visible rim damage.
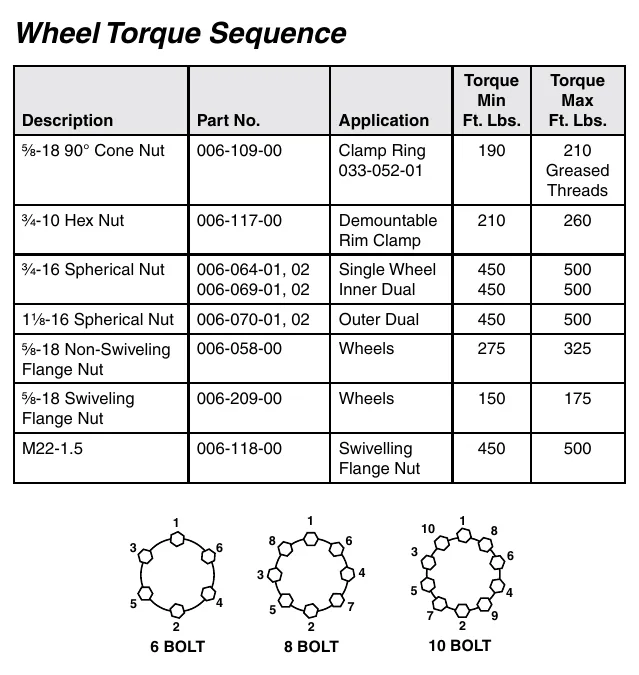
- Torque wrench and matching sockets — Tighten matching wheel hardware in the prescribed stages and sequence to its specified torque.
- Wheel chocks — Secure the trailer against unintended movement during inspection.
- Dial indicator with mounting base — Check bearing movement when required by the applicable bearing-adjustment procedure.
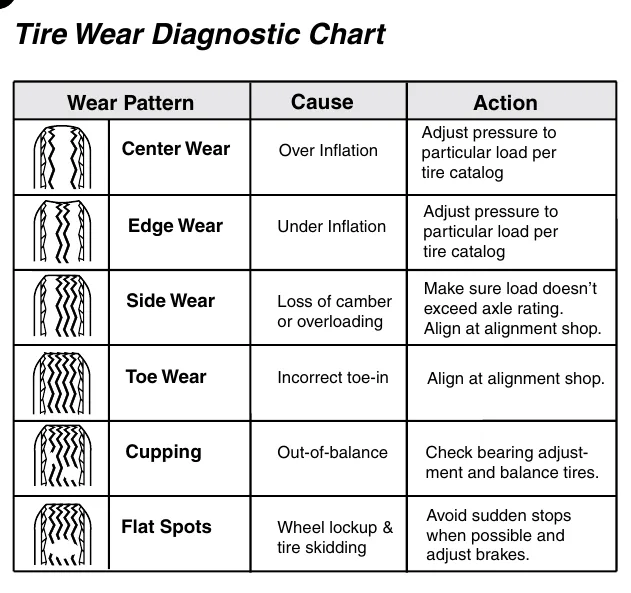
The tire-wear chart links center wear with overinflation and edge wear with underinflation. Pressure must match the tire manufacturer's recommendation for the load, and it must be checked cold rather than reduced while the tire is hot.
Side wear points toward loss of camber or overload, while toe wear points toward incorrect toe-in. Cupping calls for bearing-adjustment and balance checks; flat spots direct attention to wheel lockup and skidding. Established wear patterns can remain difficult to stop even after the underlying problem is corrected.
Wheel selection is part of failure analysis because a wheel that can be attached is not necessarily correct. Verify bolt circle, load and pressure capacity, offset, and rim contour; a changed offset can reduce axle load capacity.
Wheel attachment requires matching fasteners, hand-started threads, staged tightening, and the specified sequence. Use the torque appropriate to the actual hardware rather than a single universal value. Dexter's wheel-installation section on page 77 calls for checks after the first 50 and 100 miles following installation; values and check schedules vary by maker and application.
How It Works
Read the tread as evidence
Center wear suggests overinflation, edge wear suggests underinflation, side wear points toward loss of camber or overload, and toe wear points toward incorrect toe-in. Cupping directs bearing-adjustment and balance checks, while flat spots direct attention to wheel lockup and skidding. Treat these patterns as diagnostic leads rather than proof, because established wear can remain difficult to stop after the original cause is corrected.
Pressure and component matching
Check inflation cold against the tire manufacturer's recommendation for the load; tire heating raises pressure, so bleeding a hot tire can leave it underinflated when it cools. A wheel that attaches is not necessarily suitable: verify bolt circle, load and pressure capacity, offset, and rim contour. Offset changes alter the leverage of wheel loads on the axle assembly and can reduce axle load capacity.
Wheel attachment is a controlled process
Use matching fasteners, start threads by hand, and tighten in the specified stages and sequence so the wheel seats properly and clamping develops evenly. Select torque for the actual hardware rather than applying a universal value. Dexter's wheel-installation guidance calls for checks after the first 50 miles and again at 100 miles, then periodically; use the applicable maker and application requirements.
Step-by-Step Procedure
0/7 doneDexter page 77 wheel-installation checks; schedules vary by maker and application
| Post-installation wheel torque checks | After the first 50 miles and again at 100 miles, then periodically |
Figures
Diagnostic Chart
| Symptom | Check | Spec / Expected | Likely cause & fix |
|---|---|---|---|
| Center or edge tread wear | Classify the pattern, measure cold inflation, and compare the reading with the tire manufacturer's recommendation for the actual load. | Pressure must match the tire manufacturer's recommendation for the load; check cold and do not reduce pressure while the tire is hot. | Center wear is associated with overinflation; edge wear is associated with underinflation. Basis: 9-15k complete service manual |
| Side wear or toe wear | Evaluate loading and obtain the prescribed alignment service rather than treating the pattern as a pressure problem alone. | Use the prescribed alignment requirements and applicable load limits; no alignment measurements are supplied in this lesson. | Side wear points toward loss of camber or overload; toe wear points toward incorrect toe-in. Basis: 9-15k complete service manual |
| Cupping or localized flat spots | For cupping, check bearing adjustment and tire balance. For flat spots, investigate braking, wheel lockup, and skidding. | Follow the applicable bearing-adjustment, balance, and braking procedures; established wear may persist after correction. | Cupping can accompany bearing-adjustment or balance problems; flat spots can result from a locked tire sliding across the road. Basis: 9-15k complete service manual |
| Loose attachment hardware or uncertain replacement-wheel suitability | Verify bolt circle, load and pressure capacity, offset, rim contour, and matching fasteners. Confirm hand-started threads, staged tightening, the specified sequence, and completed follow-up checks. | Use torque appropriate to the actual hardware. Dexter checks: After the first 50 miles and again at 100 miles, then periodically. Schedules vary by maker and application. | Incorrect component matching or installation can compromise wheel seating and attachment; changed offset can reduce axle load capacity. Basis: 9-15k complete service manual |
At the Bay: Diagnose the Case
CASE 1 / 4
Center or edge tread wear
- Test
- Compare
- Correct
Select the next check
Basis: 9-15k complete service manual. A likely cause is a hypothesis; confirm it with the applicable service procedure before repair.
Common Bay Mistakes
- ✕ Do not bleed a hot tire to achieve its cold inflation recommendation.
- ✕ Do not assume bolt-on fit proves wheel compatibility.
- ✕ Do not repair or modify a wheel, mask a cracked rim with a tube, or exceed rim or wheel inflation limits.
- ✕ Do not apply universal torque values or skip applicable post-installation checks.
Quick Check
Practice only — not scored.
Plan the Service Sequence
Planning practice only. Follow the applicable manufacturer's instructions, employer safety program and qualified supervision on real equipment.
Plan the first action. Compare the service steps with the bay mistakes.
Source: 9-15k complete service manual — 75-79