Interpret Lining, Magnet, and Drum Evidence
- Distinguish acceptable lining changes from replacement conditions.
- Evaluate magnet wear and drum contact surfaces independently.
- Select balanced repairs that protect bearings and restore friction contact.
- Inspection light — Illuminate lining damage, contamination, exposed magnet coil material, and drum contact surfaces.
- Straightedge — Check magnet friction faces for uneven wear rather than relying on appearance alone.
- Caliper — Measure remaining lining thickness without including the shoe backing.
- Drum micrometer — Measure the shoe-contact surface against the applicable limits for the installed drum.
- Surface-finish comparator — Assess the refaced armature finish against the specified finish requirement.
- Bearing-cavity covers — Keep machining debris out of bearing cavities during drum work.
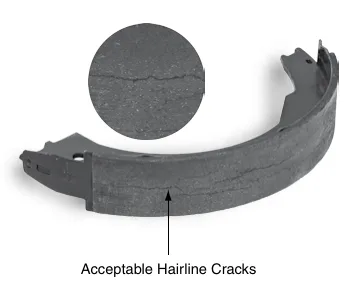
A lining inspection must distinguish acceptable hairline heat cracks in bonded material from damage requiring replacement. Grease or oil contamination, abnormal scoring, and gouging are replacement conditions. Dexter requires replacement at 1/16 inch or less remaining lining; limits vary by maker.
A magnet can fail inspection even when its surface appears generally flat. Use a straightedge to identify uneven wear, and replace a magnet if its coil is visible through the friction facing. The source calls for magnet replacement on both sides of an axle.
The drum contains separate shoe-contact and magnet-contact surfaces. Inspect both rather than treating a satisfactory shoe-contact surface as proof that the armature is serviceable. Scored or uneven armature surfaces require refacing within the applicable limits, with magnet replacement coordinated with that work.
Repair should preserve braking balance and avoid creating another failure. Replace both shoes in each brake and both brakes on the axle when lining replacement is needed, reburnish the new components, and keep machining debris out of the bearing cavities.
How It Works
Read lining evidence before condemning parts
Hairline heat cracks in bonded lining can be acceptable; missing material, grease or oil contamination, abnormal scoring, and gouging must not be dismissed as equivalent surface changes. Contamination changes friction behavior, while damaged material compromises dependable contact. Dexter requires replacement at 1/16 inch or less remaining lining, but the installed maker's limits must govern.
Separate magnet evidence from shoe-contact evidence
The drum shoe-contact surface and magnet-contact armature surface perform different jobs, so a satisfactory shoe track does not establish that the armature is serviceable. Check magnet wear with a straightedge and replace a magnet whose coil is visible through the facing. Scored or uneven armature surfaces require refacing within applicable limits and coordinated magnet replacement; the supplied Dexter limits specify maximum armature material removal of 0.030 inch and an armature finish after refacing of 120 microinch.
Repair for balance without introducing damage
When lining replacement is required, replace both shoes in each brake and both brakes on the axle; the source also calls for magnet replacement on both sides of an axle. Reburnishing replacement friction components develops mating contact, while protecting and cleaning bearing cavities prevents abrasive machining debris from damaging bearings. Older linings may contain asbestos: do not create dust through compressed-air cleaning, dry brushing, machining, filing, or grinding the linings.
Step-by-Step Procedure
0/7 doneDexter friction inspection limits; values vary by maker
| Lining replacement threshold | 1/16 inch or less |
| Maximum armature material removal | 0.030 inch |
| Armature finish after refacing | 120 microinch |
Figures
Diagnostic Chart
| Symptom | Check | Spec / Expected | Likely cause & fix |
|---|---|---|---|
| Bonded lining shows cracks, damaged areas, or reduced thickness. | Distinguish hairline heat cracks from missing material; inspect for abnormal scoring and gouging, and measure remaining lining thickness. | Dexter lining replacement threshold: 1/16 inch or less. Limits vary by maker; acceptable hairline heat cracks alone are not a replacement condition. | Heat-related surface changes can resemble failure, but material loss, abnormal scoring, gouging, or exhausted lining require replacement. Basis: 9-15k complete service manual |
| Lining has grease or oil contamination. | Inspect friction material for contamination and identify the contamination source before installing replacement components. | Grease or oil contamination is a replacement condition. Replace both shoes in each brake and both brakes on the axle, then reburnish. | Contamination makes friction behavior unreliable; an unresolved leak can contaminate replacement parts. Basis: 9-15k complete service manual |
| Magnet face appears flat but has questionable wear or exposed coil material. | Apply a straightedge across the friction face to reveal uneven wear and inspect for coil exposure. | Replace a magnet if its coil is visible through the friction facing. Replace magnets on both sides of the axle. | Visual appearance can conceal uneven contact; coil exposure indicates that the friction facing has worn through. Basis: 9-15k complete service manual |
| Drum shoe track looks satisfactory, but the armature is scored or uneven. | Inspect the armature independently, verify applicable machining limits, and coordinate magnet replacement with refacing. Protect bearing cavities from debris. | Maximum armature material removal: 0.030 inch. Armature finish after refacing: 120 microinch. Apply the correct limits for the installed drum. | The separate magnet-contact surface can develop wear that is not evident from the shoe-contact surface. Basis: 9-15k complete service manual |
At the Bay: Diagnose the Case
CASE 1 / 4
Bonded lining shows cracks, damaged areas, or reduced thickness.
- Test
- Compare
- Correct
Select the next check
Basis: 9-15k complete service manual. A likely cause is a hypothesis; confirm it with the applicable service procedure before repair.
Common Bay Mistakes
- ✕ Condemning acceptable hairline heat cracks while overlooking contamination or missing lining.
- ✕ Accepting magnet flatness by eye or approving an armature from the shoe track alone.
- ✕ Replacing only the visibly damaged friction component instead of the specified axle-balanced grouping.
- ✕ Creating dust from older linings or allowing machining debris into bearing cavities.
Quick Check
Practice only — not scored.
Plan the Service Sequence
Planning practice only. Follow the applicable manufacturer's instructions, employer safety program and qualified supervision on real equipment.
Plan the first action. Compare the service steps with the bay mistakes.
Source: 9-15k complete service manual — 16-18, 56-57