Wheel Fastener Selection, Staged Torque, and Rechecks
- Select the torque-chart row that matches the wheel, stud, and fastener arrangement.
- Apply staged torque with correctly matched, hand-started fasteners.
- Complete required torque checks before use and after installation.
- Torque wrench — Apply each specified torque stage and verify final lug-nut torque.
- Correct-fitting lug socket — Engage the lug nut fully without damaging its wrenching surfaces.
- Hand ratchet — Assist with hand-tightening after the fasteners have been started freely by hand; do not substitute it for final torque measurement.
- Inspection light — Inspect stud threads, nut seats, and wheel seating surfaces for damage or interference.
- Shop brush — Remove loose debris from accessible mounting surfaces before inspecting and assembling.
Wheel retention depends on accurate mounting torque. The installation manual requires a torque wrench rather than another tightening method for final lug-nut torque, and requires the fastener cone angle to match the wheel.
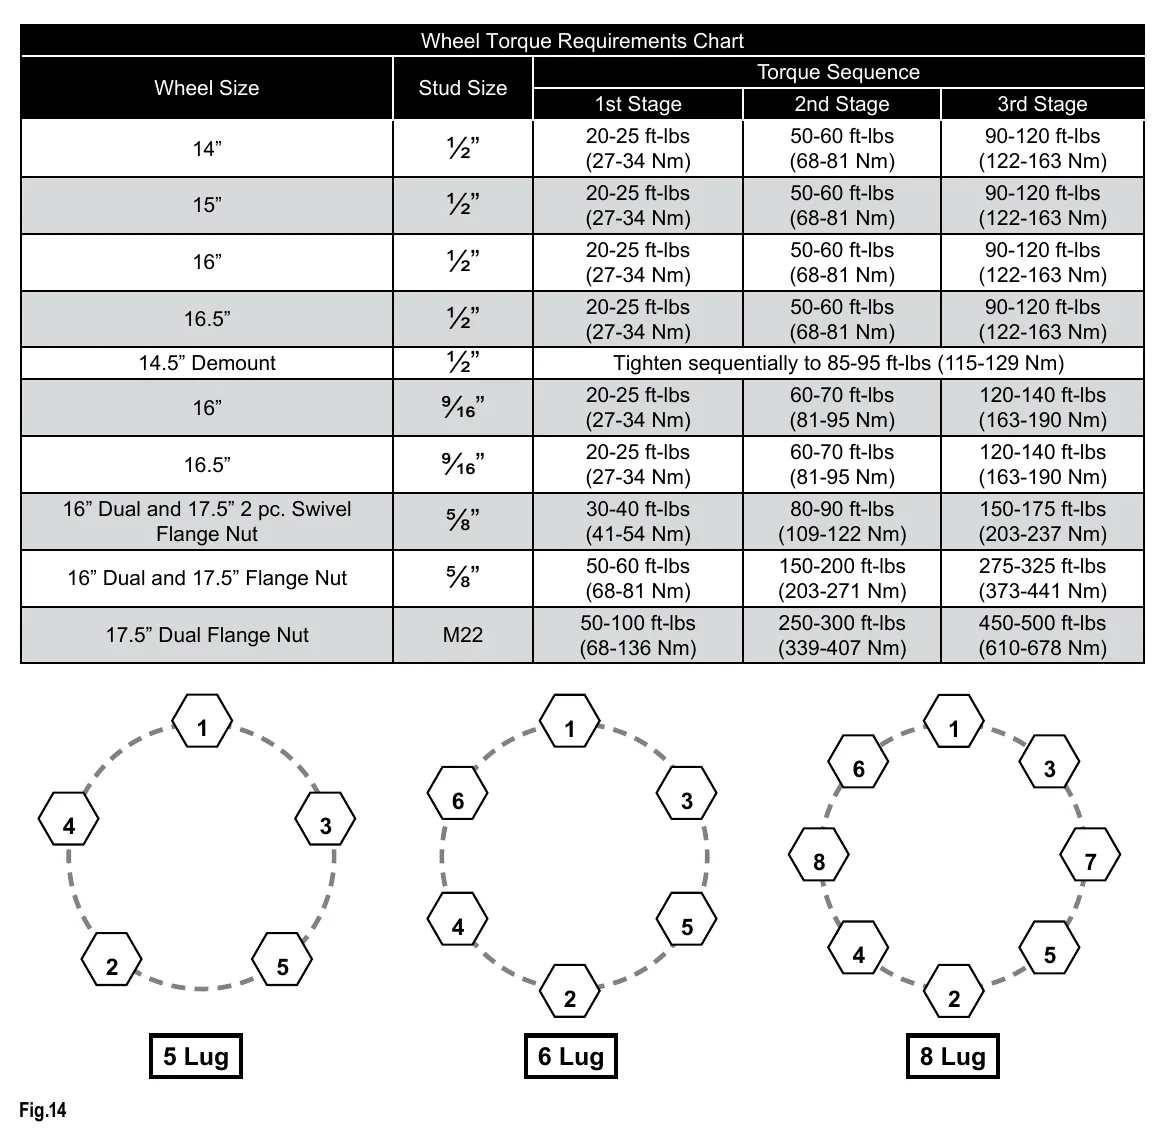
Start fasteners by hand to prevent cross-threading, then hand-tighten in the illustrated sequence. After hand-tightening, apply the chart's torque stages in that sequence rather than treating all wheel and fastener arrangements as equivalent.
Select the chart row by wheel size, stud size, and fastener arrangement. For the listed 14-, 15-, and 16-inch wheels with half-inch studs, Lippert specifies stages of 20-25, 50-60, and 90-120 ft-lb. Values vary by maker and wheel configuration; these stages are not a universal trailer specification.
Torque the lugs before first road use and after each wheel removal. Lippert specifies rechecking and retorquing after 10, 25, and 50 miles, with periodic checks during regular service; values vary by maker. Do not confuse these wheel-fastener requirements with the separate spindle-nut procedure.
How It Works
Correct seating creates reliable clamp load
Tightening stretches the stud elastically, creating the clamp load that holds the wheel against its mounting surface. A mismatched fastener cone angle prevents proper seating, while damaged threads or trapped debris can make tightening resistance misleading. Incorrect wheel torque can allow loosening or stud damage and can cause serious injury, death, or property damage.
Chart selection and staged tightening
Select the chart row by wheel size, stud size, and fastener arrangement; for the listed 14-, 15-, and 16-inch wheels with half-inch studs, the Lippert stages are 20-25, 50-60, and 90-120 ft-lb. Start fasteners by hand, hand-tighten in the illustrated sequence, and then apply each stage in that sequence with a torque wrench. Progressive tightening helps seat the wheel evenly, but these values are not universal trailer specifications.
Rechecks protect retention after installation
Torque the lugs before first road use and after every wheel removal; the documented Lippert installation requires rechecking and retorquing after 10, 25, and 50 miles, with periodic checks during regular service. Seating surfaces can settle under road loads, reducing clamp load even when the initial installation was correctly torqued. Follow the applicable maker's requirements and keep wheel-fastener torque separate from the spindle-nut procedure.
Step-by-Step Procedure
0/7 doneLippert wheel-service values; values vary by maker and configuration
| Listed 14-, 15-, and 16-inch wheels with half-inch studs | Stages: 20-25, 50-60, and 90-120 ft-lb |
| Post-installation torque checks | 10, 25, and 50 miles (16, 40, and 80 km) |
Figures
Diagnostic Chart
| Symptom | Check | Spec / Expected | Likely cause & fix |
|---|---|---|---|
| A fastener binds before its cone seats against the wheel. | Stop tightening, remove the fastener, and inspect the nut and stud threads for damage or contamination; confirm it starts freely by hand. | Start fasteners by hand to prevent cross-threading. | Cross-threading or damaged threads can create resistance without properly clamping the wheel. Basis: ccd-0011131 |
| A lug nut does not seat correctly against the wheel. | Verify that the fastener cone angle matches the wheel before proceeding with torque. | The fastener cone angle must match the wheel. | An incompatible cone concentrates contact instead of seating properly. Basis: ccd-0011131 |
| Final torque was applied without confirming the wheel configuration or completing the stages. | Identify wheel size, stud size, and fastener arrangement, then follow the matching chart row and illustrated tightening sequence with a torque wrench. | Listed 14-, 15-, and 16-inch wheels with half-inch studs: 20-25, 50-60, and 90-120 ft-lb; values vary by maker and configuration. | Using a familiar final value or skipping the prescribed stages does not establish that the required installation procedure was followed. Basis: ccd-0011131 |
| Lug torque is below the applicable requirement at a scheduled recheck. | Recheck and retorque as required; investigate seating, fastener compatibility, and installation history if loss of torque recurs. | Recheck and retorque after 10, 25, and 50 miles and periodically during service for the documented Lippert installation. | Seating changes or an installation fault can reduce wheel retention after initial tightening. Basis: ccd-0011131 |
At the Bay: Diagnose the Case
CASE 1 / 4
A fastener binds before its cone seats against the wheel.
- Test
- Compare
- Correct
Select the next check
Basis: ccd-0011131. A likely cause is a hypothesis; confirm it with the applicable service procedure before repair.
Common Bay Mistakes
- ✕ Treating the listed Lippert torque stages as universal.
- ✕ Using an impact wrench instead of a torque wrench for final torque.
- ✕ Forcing a binding fastener rather than checking its threads.
- ✕ Confusing wheel-lug torque with spindle-nut adjustment.
Quick Check
Practice only — not scored.
Plan the Service Sequence
Planning practice only. Follow the applicable manufacturer's instructions, employer safety program and qualified supervision on real equipment.
Plan the first action. Compare the service steps with the bay mistakes.
Hands-on: Shop Test Equipment
ABS Sensor Gap & Blink-Code Scanner
Non-magnetic feeler gauge, AC millivolt meter on the sensor, ECU blink-code button
🛠 Equip your bay for this test →Symptom: Post-repair verification.
Spec limits used
- 1.00–1.75 mm — Wheel-speed sensor air gap (Lippert ABS manual, p.13)
- 068Ah / 0006h — Sensor fault codes (Lippert ABS)
- illustrative only — Sensor AC output while spinning (General shop practice)
Simulated readings for practice. Always follow the manufacturer's procedure and values on a real trailer.
Source: ccd-0011131 — 8-9